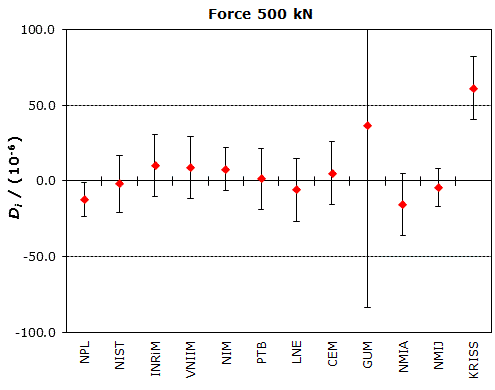

CCM.F-K3.a and CCM.F-K3.b
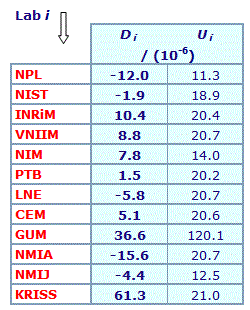
MEASURAND : Force
NOMINAL VALUE : 500 kN
Degrees of equivalence Di and expanded uncertainty Ui (k = 2) expressed in 10-6

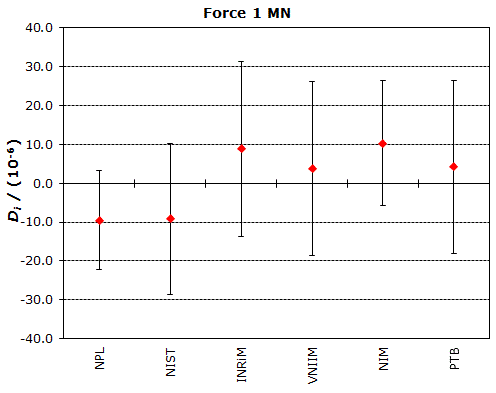
CCM.F-K3.a
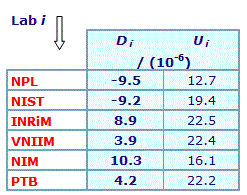
MEASURAND : Force
NOMINAL VALUE : 1 MN
Degrees of equivalence Di and expanded uncertainty Ui (k = 2)
expressed in 10-6

CCM.F-K3.a and CCM.F-K3.b
MEASURAND : Force
NOMINAL VALUE : 500 kN
Degrees of equivalence relative to the CCM.F-K3 reference value:

Results are presented under A4 printable format in Summary Results (PDF file).
CCM.F-K3.a
MEASURAND : Force
NOMINAL VALUE : 1 MN
Degrees of equivalence relative to the CCM.F-K3 reference value:

Results are presented under A4 printable format in Summary Results (PDF file).
| Metrology area, Sub-field | Mass and related quantities, Force |
| Description | Force measurements |
| Time of measurements | 2013 - 2021 |
| Status | Report in progress, draft B |
| Measurand | Force 0.5 MN and 1 MN |
| Transfer device | Force transducer |
| Comparison type | Key Comparison |
| Consultative Committee | CCM (Consultative Committee for Mass and Related Quantities) |
| Conducted by | EURAMET (European Association of National Metrology Institutes) |
| RMO Internal Identifier | EURAMET Project No 505 |
| Pilot institute |
PTB
Physikalisch-Technische Bundesanstalt Germany |
| Contact person | D. Röske +49 (0) 531 592 1210 |
| Pilot laboratory | |
|---|---|
| PTB |
Physikalisch-Technische Bundesanstalt, Germany, EURAMET |
| BEV |
Bundesamt für Eich- und Vermessungswesen, Austria, EURAMET |
| BFKH |
Government Office of the Capital City Budapest, Hungary, EURAMET |
| CEM |
Centro Español de Metrologia, Spain, EURAMET |
| CMI |
Czech Metrology Institute, Czechia, EURAMET |
| EIM |
Hellenic Institute of Metrology, Greece, EURAMET |
| FORCE |
FORCE Technology, Denmark, EURAMET |
| GUM |
Glowny Urzad Miar, Central Office of Measures, Poland, EURAMET |
| INM |
National Institute of Metrology, Romania, EURAMET |
| INRIM |
Istituto Nazionale di Ricerca Metrologica, Italy, EURAMET |
| IPQ |
Instituto Portugues da Qualidade, Portugal, EURAMET |
| LNE |
Laboratoire national de métrologie et d'essais, France, EURAMET |
| METAS |
Federal Institute of Metrology, Switzerland, EURAMET |
| MIKES |
VTT Technical Research Centre of Finland Ltd, Centre for Metrology/Mittatekniikan keskus, Finland, EURAMET |
| RISE |
Research Institutes of Sweden AB, Sweden, EURAMET |
| UME |
TÜBITAK Ulusal Metroloji Enstitüsü, Türkiye, EURAMET |
This page proposes print-out on A4 paper (portrait) of the comparison details (best printed out using a black and white printer).
Please, select items to be printed out, then click on "OK" :
CCM.F-K3.a and CCM.F-K3.b
MEASURAND : Force
NOMINAL VALUE : 500 kN
|
The key comparison reference value, xR, is calculated as the weighted mean of the corrected measurement results from CCM.F-K3.a and CCM.F-K3.b. Correlations were considered when evaluating the associated standard uncertainty, uR. |

| The degree of equivalence of each laboratory i with respect to the key comparison reference reference value is given by a pair of terms, both expressed in 10-6: Di , where Di is the relative reviation of the final result from xR, and Ui, its expanded uncertainty (k = 2). |
CCM.F-K3.a
MEASURAND : Force
NOMINAL VALUE : 1 MN
|
The key comparison reference value, xR, is calculated as the weighted mean of the corrected measurement results from CCM.F-K3.a. Correlations were considered when evaluating the associated standard uncertainty, uR. |

| The degree of equivalence of each laboratory i with respect to the key comparison reference reference value is given by a pair of terms, both expressed in 10-6: Di , where Di is the relative reviation of the final result from xR, and Ui, its expanded uncertainty (k = 2). |
CCM.F-K3.a and CCM.F-K3.b
MEASURAND : Force
NOMINAL VALUE : 500 kN
CCM.F-K3.a: Two force steps of 500 kN were employed.
CCM.F-K3.b: Two compression force transducers of 500 kN and one force step of 500 kN were emplyed.
Measurements were carried out from 2005 to 2011.
The measurement results for CCM.F-K3.a and CCM.F-K3.b are presented in Section 7 (pp. 6 to 17) of the CCM.F-K3 Final report.
CCM.F-K3.a
MEASURAND : Force
NOMINAL VALUE : 1 MN
CCM.F-K3.a: Two compression force transducers of 1 MN were employed.
Measurements were carried out from 2005 to 2011.
The measurement results for CCM.F-K3.a are presented in Section 7 (pp. 6 to 17) of the CCM.F-K3 Final report.