
No graphs of equivalence are drawn up for supplementary comparisons.
No graphs of equivalence are drawn up for supplementary comparisons.
No degrees of equivalence are computed for supplementary comparisons.
No degrees of equivalence are computed for supplementary comparisons.
| Metrology area, Sub-field | Length, Dimensional Metrology |
| Description | Nanometrology: one-dimensional gratings |
| Time of measurements | 1999 - 2000 |
| Status | Approved |
| Final Reports of the comparisons | |
| Measurand | Pitch of gratings: 290 nm and 700 nm |
| Transfer device | One-dimensional holographic gratings |
| Comparison type | Supplementary Comparison |
| Consultative Committee | CCL (Consultative Committee for Length ) |
| Conducted by | CCL (Consultative Committee for Length ) |
| Comments | Central area: 1 mm x 1 mm Results published on 20 December 2001 One-dimensional gratings |
| Pilot institute |
METAS
Federal Institute of Metrology Switzerland |
| Contact person | Felix Meli +41 (0) 58 387 03 46 |
| Pilot laboratory | |
|---|---|
| METAS |
Federal Institute of Metrology, Switzerland, EURAMET |
| CMS/ITRI |
Industrial Technology Research Institute/Center for Measurement Standards, Chinese Taipei, APMP |
| CNR-IMGC |
Consiglio Nazionale delle Ricerche - Istituto di Metrologia G. Colonnetti (until 2006), Italy, EURAMET |
| DFM |
Danish Fundamental Metrology A/S, Denmark, EURAMET |
| KRISS |
Korea Research Institute of Standards and Science, Korea, Republic of, APMP |
| NIM |
National Institute of Metrology, China, APMP |
| NIST |
National Institute of Standards and Technology, United States, SIM |
| NMIJ AIST |
National Metrology Institute of Japan, Japan, APMP |
| NPL |
National Physical Laboratory, United Kingdom, EURAMET |
| PTB |
Physikalisch-Technische Bundesanstalt, Germany, EURAMET |
| VNIIM |
D.I. Mendeleyev Institute for Metrology, Rosstandart, Russian Federation, COOMET |
This page proposes print-out on A4 paper (portrait) of the comparison details (best printed out using a black and white printer).
Please, select items to be printed out, then click on "OK" :
Supplementary comparison results are not interpreted in terms of equivalence.
Supplementary comparison results are not interpreted in terms of equivalence.
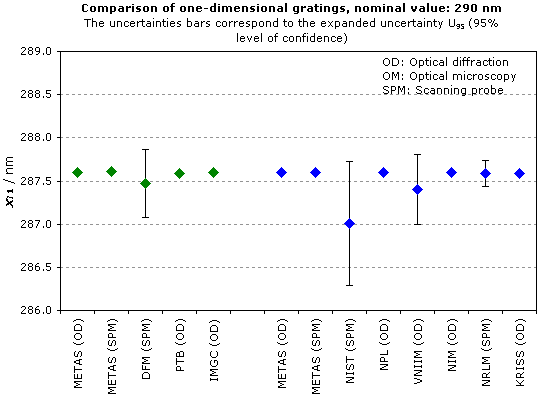
MEASURAND : Average pitch of grating, measured in central area (1 mm x 1 mm)
NOMINAL PITCH VALUE : P1 = 290 nm
xi1 : result of measurement carried out by laboratory i
ui1 : combined standard uncertainty of xi1 reported by laboratory i
xR1 : reference value for grating of nominal value P1, obtained from the weighted mean of the participant values xi1
uR1 : standard uncertainty of the reference value obtained from the reported standard uncertainties ui1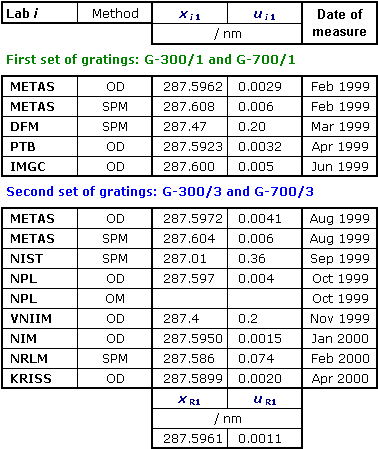
OD : Optical diffraction
SPM : Scanning probe methods
OM : Optical microscopy
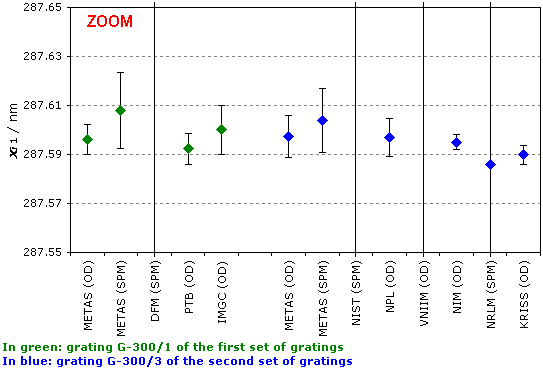
MEASURAND : Average pitch of grating, measured in central area (1 mm x 1 mm)
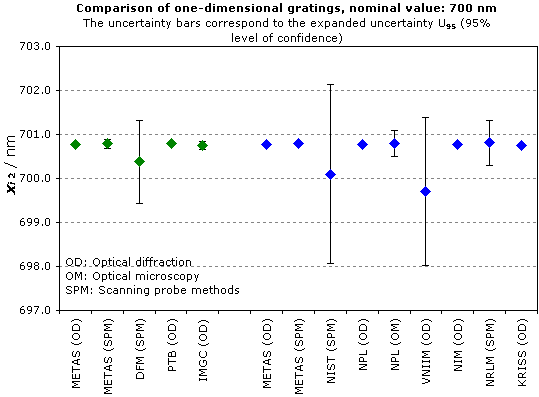
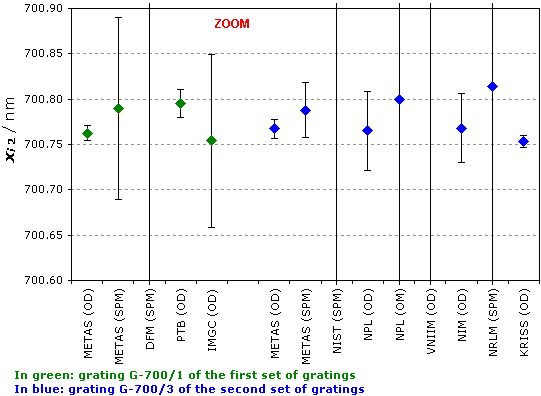
NOMINAL PITCH VALUE : P2 = 700 nm
xi2 : result of measurement carried out by laboratory i
ui2 : combined standard uncertainty of xi2 reported by laboratory i
xR2 : reference value for grating of nominal value P2, obtained from the weighted mean of the participant values xi2
uR2 : standard uncertainty of the reference value obtained from the reported standard uncertainties ui2
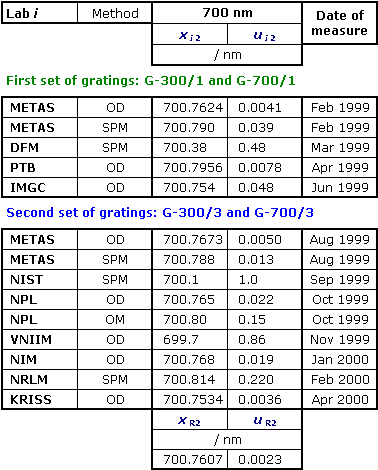
OD : Optical diffraction
SPM : Scanning probe methods
OM : Optical microscopy
