

MEASURAND : Relative positions of the gauge surfaces with respect to the centre of the front surface of the first gauge
TRAVELLING STANDARD : A 1020 mm long step gauge with 51 steps
Degrees of equivalence: constant component, Dic and expanded uncertainty Uic
(k = 2), and proportional component, Dip and expanded uncertainty Uip (k = 2)
_step.gif)
_step.gif)
MEASURAND : Length between the ball centres of each ball bar
Ball bar material : 2 steel ball bars and one Super Invar ball bar
NOMINAL VALUES : 400 mm and 800 mm for steel ball bars and 800 mm for Super Invar ball bar
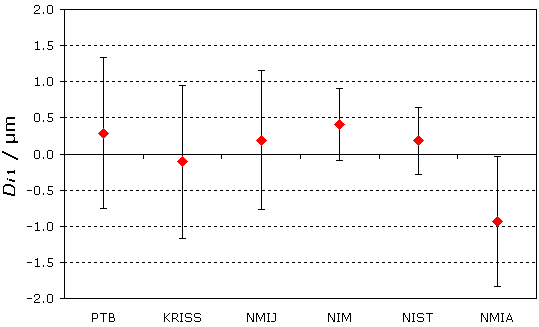
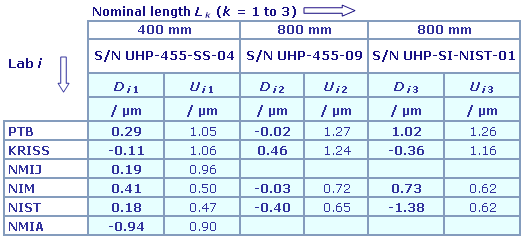
Degrees of equivalence, Di and expanded uncertainty Ui (coverage factor 2), for each ball bar with nominal value LkL1 = 400 mm, steel ball bar
L2 = 800 mm, steel ball bar
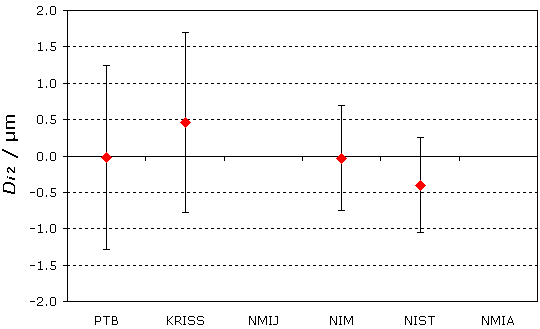
Note that NMIJ and NMIA reported no results for steel ball bar with nominal length 800 mm.
L3 = 800 mm, Super Invar ball bar
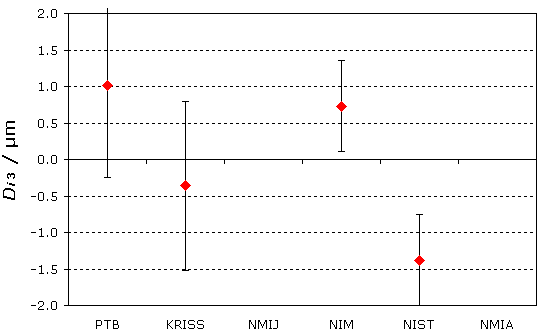
Note that NMIJ and NMIA reported no results for Super Invar ball bar with nominal length 800 mm.
MEASURAND : Relative positions of the gauge surfaces with respect to the centre of the front surface of the first gauge
TRAVELLING STANDARD : A 1020 mm long step gauge with 51 steps
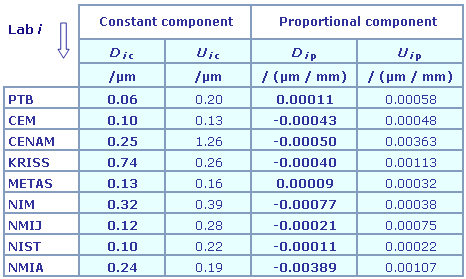
Degrees of equivalence: constant component, Dic and expanded uncertainty Uic
(k = 2), and proportional component, Dip and expanded uncertainty Uip (k = 2)
Results are presented under A4 printable format in Summary Results (.PDF file).
MEASURAND : Length between the ball centres of each ball bar
Ball bar material : 2 steel ball bars and one Super Invar ball bar
NOMINAL VALUES : 400 mm and 800 mm for steel ball bars and 800 mm for Super Invar ball bar
Degrees of equivalence, Di and expanded uncertainty Ui (coverage factor 2), for each ball bar k
Results are presented under A4 printable format in Summary Results (.PDF file).
| Metrology area, Sub-field | Length, Dimensional Metrology |
| Description | One-dimensional coordinate measuring machine artefacts |
| Time of measurements | 1999 - 2002 |
| Status | Approved for equivalence |
| Final Reports of the comparisons | |
| References | |
| Measurand | Length of individual gauges of the step-gauge and distance of ball centres |
| Transfer device | One step gauge of 1020 mm and three ball bars of 400 mm and 800 mm nominal length |
| Comparison type | Key Comparison |
| Consultative Committee | CCL (Consultative Committee for Length ) |
| Conducted by | CCL (Consultative Committee for Length ) |
| Comments | Results published on 07 July 2006 Step gauge and ball bars |
| Pilot institute |
PTB
Physikalisch-Technische Bundesanstalt Germany |
| Contact person | O. Jusko +49 (0) 531 592 5310 |
| Pilot laboratory | |
|---|---|
| PTB |
Physikalisch-Technische Bundesanstalt, Germany, EURAMET |
| CEM |
Centro Español de Metrologia, Spain, EURAMET |
| CENAM |
Centro Nacional de Metrologia, Mexico, SIM |
| CSIR-NML |
Council for Scientific and Industrial Research, National Metrology Laboratory (became NMISA in 2007), South Africa, AFRIMETS |
| INRIM |
Istituto Nazionale di Ricerca Metrologica, Italy, EURAMET |
| KRISS |
Korea Research Institute of Standards and Science, Korea, Republic of, APMP |
| METAS |
Federal Institute of Metrology, Switzerland, EURAMET |
| NIM |
National Institute of Metrology, China, APMP |
| NIST |
National Institute of Standards and Technology, United States, SIM |
| NMIA |
National Measurement Institute, Australia, Australia, APMP |
| NMIJ AIST |
National Metrology Institute of Japan, Japan, APMP |
| NRC |
National Research Council, Canada, SIM |
| VNIIM |
D.I. Mendeleyev Institute for Metrology, Rosstandart, Russian Federation, COOMET |
This page proposes print-out on A4 paper (portrait) of the comparison details (best printed out using a black and white printer).
Please, select items to be printed out, then click on "OK" :
MEASURAND : Relative positions of the gauge surfaces with respect to the centre of the front surface of the first gauge
TRAVELLING STANDARD : A 1020 mm long step gauge with 51 steps
|
The key comparison reference value, xR, is obtained by taking first the mean of the measurement results reported by PTB, METAS, NMIJ and NIST, and then by fitting a linear regression to obtain the constant xRc and proportional xRp parts such that
|
| Degrees of equivalence relative to the key comparison reference value have been analysed into constant Dic and proportional Dip terms with expanded uncertainties (coverage factor k = 2) Uic and Uip, for each laboratory i, as explained in Appendix B on pages 32 and 33 of the Final Report. |
| The pair-wise degrees of equivalence are not computed for this comparison. |
MEASURAND : Length between the ball centres of each ball bar
Ball bar material : 2 steel ball bars and one Super Invar ball bar.
NOMINAL VALUES : 400 mm and 800 mm for steel ball bars and 800 mm for Super Invar ball bar
|
For each ball bar k, the key comparison reference value, xRk, is obtained as the mean of all participants' values xik. The standard uncertainty, uRk, of key comparison reference value xRk, is obtained from the reported standard uncertainties uik, as given in equation 6 on page 25 of the Final Report.
|
|
The degree of equivalence of each laboratory i with respect to the key comparison reference value for each ball bar k is given by a pair of terms expressed in µm: |
| The pair-wise degrees of equivalence are not computed for this comparison. |
MEASURAND : Relative positions of the gauge surfaces with respect to the centre of the front surface of the first gauge
TRAVELLING STANDARD : A 1020 mm long step gauge with 51 steps
The participants' reported values and corresponding standard uncertainties are given in Tables 2 and 4 of the Final Report (page 13 and page 15, respectively), for the 51 steps.
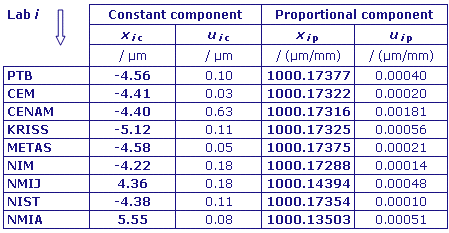
For each laboratory i, a linear regression was fitted on the data, so the measurement of 51 gauge surfaces is analysed into constant xic and proportional xip parts.
The measurement of laboratory i is thus expressed as xi = xic + xip L, where L is the interval length in mm. In the same way, the standard uncertainty of laboratory i is expressed as ui = uic + uip L.
VNIIM and INRIM withdrew during the comparison.
NRC and CSIR-NML did not report any data due to technical problems.
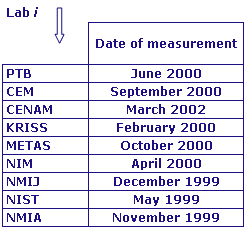
CENAM realised a re-measure in 2002.
MEASURAND : Length between the ball centres of each ball bar
Ball bar material : 2 steel ball bars and one Super Invar ball bar
NOMINAL VALUES : 400 mm and 800 mm for steel ball bars and 800 mm for Super Invar ball bar
xik : result of measurement carried out by laboratory i for ball bar k with nominal length Lk, expressed as the deviation from nominal length in µm
uik : combined standard uncertainty of xik reported by laboratory i
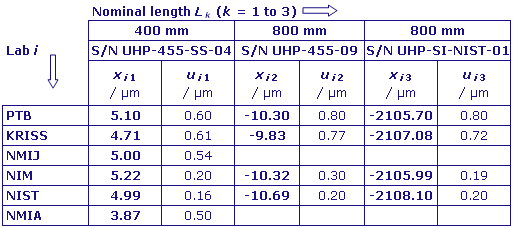
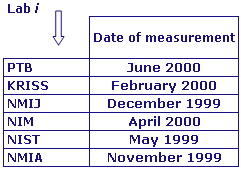
VNIIM and INRIM withdrew during the comparison. NMIJ and NMIA reported results only for steel ball bar with nominal length 400 mm.
NRC and CSIR-NML did not report any data due to technical problems.
CEM, CENAM, and METAS did not participate in the ball bars comparison.