

MEASURAND : Internal diameter
GAUGE : 3.5/5 mm ring
Degrees of equivalence: Di and expanded uncertainty Ui (k = 2), expressed in µm
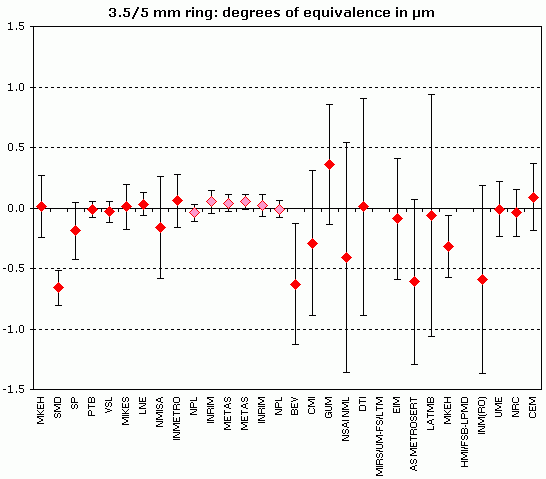
Group 1 and Group 2 laboratories (red diamonds) shown on the left and on the right, respectively, with linking laboratories (pink diamonds) in the middle of the graph
MEASURAND : Internal diameter
GAUGE : 40 mm ring
Degrees of equivalence: Di and expanded uncertainty Ui (k = 2), expressed in µm
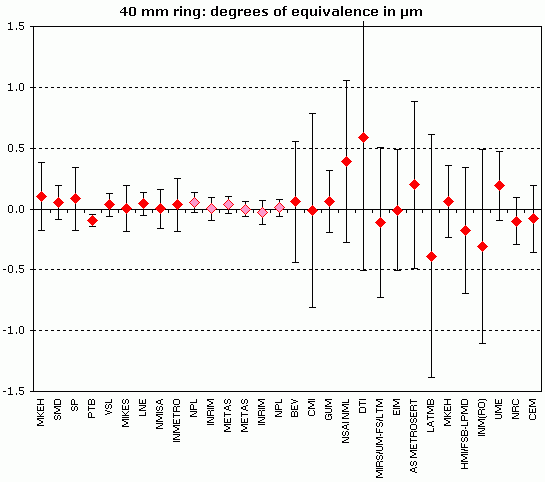
Group 1 and Group 2 laboratories (red diamonds) shown on the left and on the right, respectively, with linking laboratories (pink diamonds) in the middle of the graph
MEASURAND : External diameter
GAUGE : 4/5 mm plug
Degrees of equivalence: Di and expanded uncertainty Ui (k = 2), expressed in µm
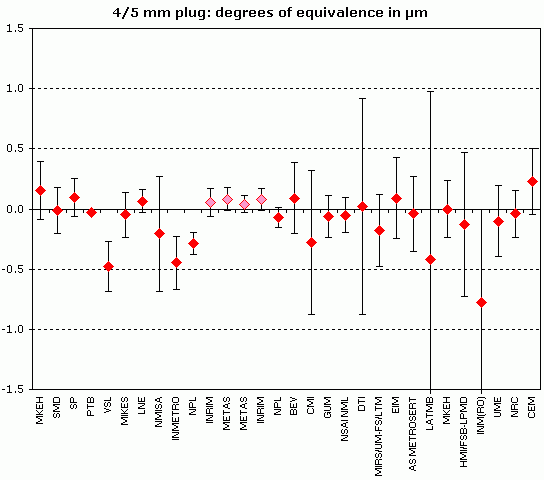
Group 1 and Group 2 laboratories (red diamonds) shown on the left and on the right, respectively, with linking laboratories (pink diamonds) in the middle of the graph
MEASURAND : External diameter
GAUGE : 50 mm plug
Degrees of equivalence: Di and expanded uncertainty Ui (k = 2), expressed in µm
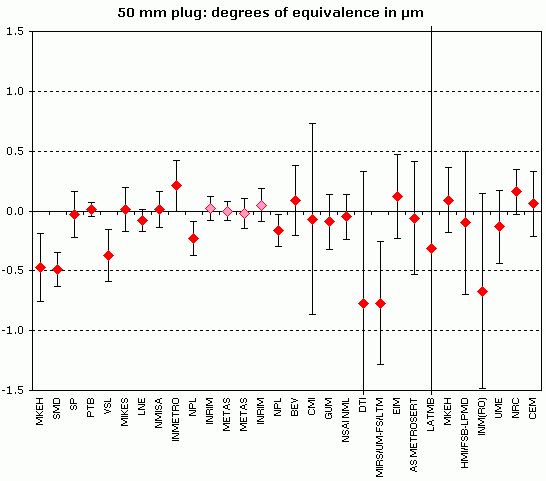
Group 1 and Group 2 laboratories (red diamonds) shown on the left and on the right, respectively, with linking laboratories (pink diamonds) in the middle of the graph
ULATMB = 2 µm
MEASURAND : External diameter
GAUGE : 30 mm sphere
Degrees of equivalence: Di and expanded uncertainty Ui (k = 2), expressed in µm
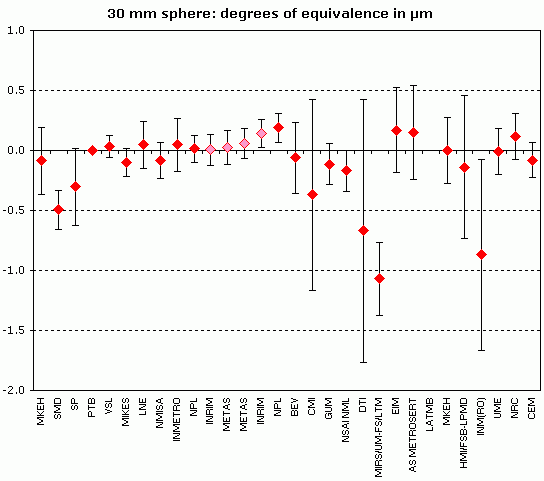
Group 1 and Group 2 laboratories (red diamonds) shown on the left and on the right, respectively, with linking laboratories (pink diamonds) in the middle of the graph
MEASURAND : Internal diameter
GAUGE : 3.5/5 mm ring
Degrees of equivalence: Di and expanded uncertainty Ui (k = 2), expressed in µm
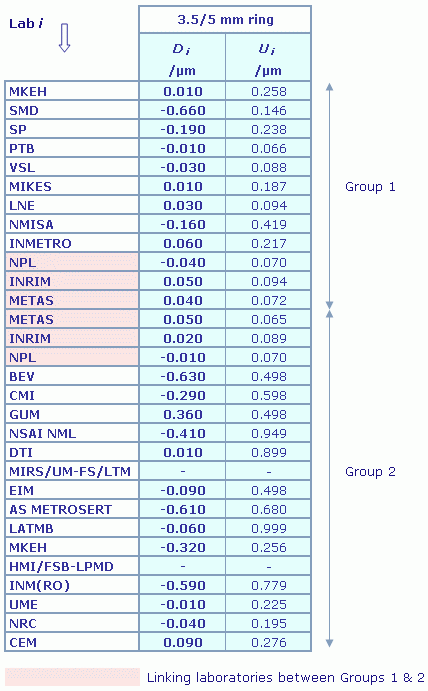
Results are presented under A4 printable format in Summary Results (PDF file).
MEASURAND : Internal diameter
GAUGE : 40 mm ring
Degrees of equivalence: Di and expanded uncertainty Ui (k = 2), expressed in µm
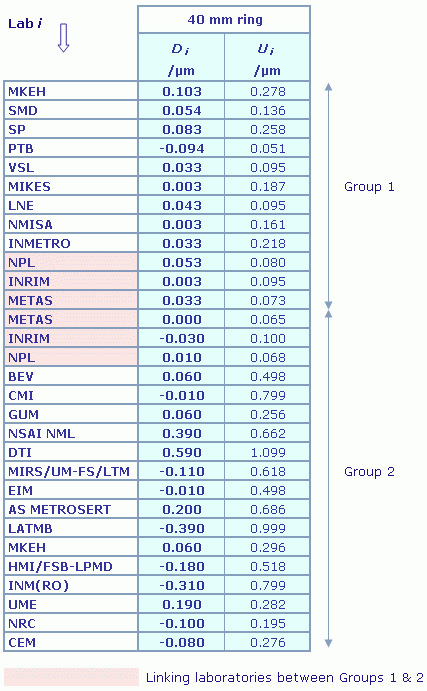
Results are presented under A4 printable format in Summary Results (PDF file).
MEASURAND : External diameter
GAUGE : 4/5 mm plug
Degrees of equivalence: Di and expanded uncertainty Ui (k = 2), expressed in µm
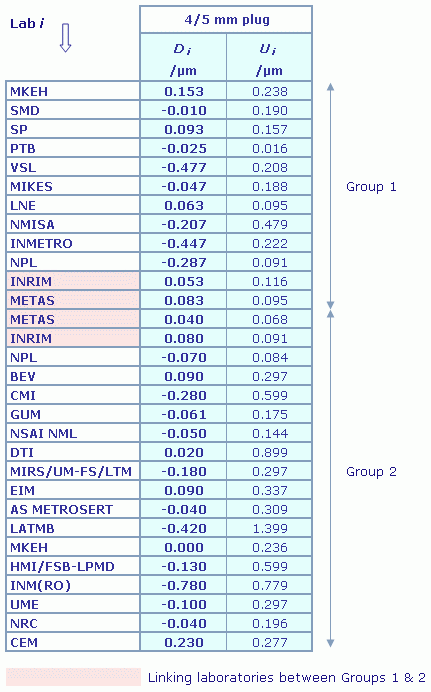
Results are presented under A4 printable format in Summary Results (PDF file).
MEASURAND : External diameter
GAUGE : 50 mm plug
Degrees of equivalence: Di and expanded uncertainty Ui (k = 2), expressed in µm
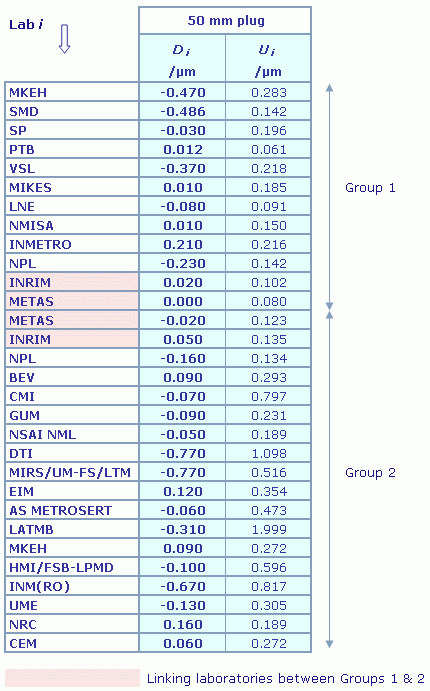
Results are presented under A4 printable format in Summary Results (PDF file).
MEASURAND : External diameter
GAUGE : 30 mm sphere
Degrees of equivalence: Di and expanded uncertainty Ui (k = 2), expressed in µm
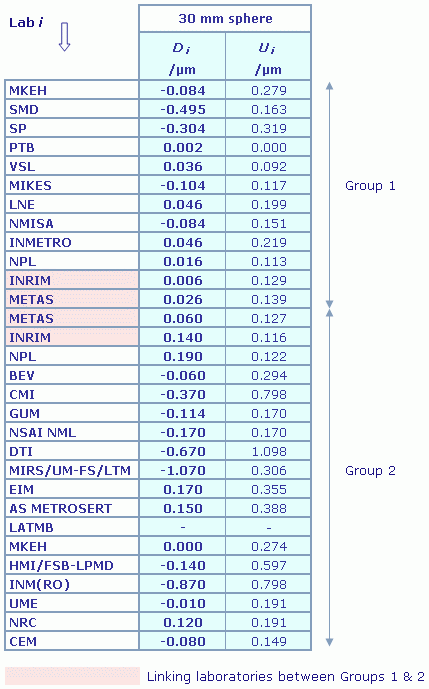
Results are presented under A4 printable format in Summary Results (PDF file).
| Metrology area, Sub-field | Length, Dimensional Metrology |
| Description | Outer diameter standards |
| Time of measurements | 2005 - 2007 |
| Status | Approved |
| Final Reports of the comparisons | |
| References | |
| Measurand | Ring, plug, and sphere diameters: from 3.5 mm to 30 mm Roundness and straightness of the ring and plug gauges |
| Transfer device | Ring and plug gauges, spheres |
| Comparison type | Key Comparison |
| Consultative Committee | CCL (Consultative Committee for Length ) |
| Conducted by | EURAMET (European Association of National Metrology Institutes) |
| RMO Internal Identifier | EUROMET Project No 812 |
| Comments | The participating laboratories are split up into two groups: Results published on 25 April 2012 Diameter standards |
| Pilot institute |
INRIM
Istituto Nazionale di Ricerca Metrologica Italy |
| Contact person | Gian Bartolo Picotto +39 011 391 9969 |
| Additional |
| Pilot laboratory | |
|---|---|
| INRIM |
Istituto Nazionale di Ricerca Metrologica, Italy, EURAMET |
| AS METROSERT |
Central Office of Metrology, Estonia, EURAMET |
| BEV |
Bundesamt für Eich- und Vermessungswesen, Austria, EURAMET |
| CEM |
Centro Español de Metrologia, Spain, EURAMET |
| CMI |
Czech Metrology Institute, Czechia, EURAMET |
| DTI |
Danish Technological Institute, Denmark, EURAMET |
| EIM |
Hellenic Institute of Metrology, Greece, EURAMET |
| GUM |
Glowny Urzad Miar, Central Office of Measures, Poland, EURAMET |
| HMI/FSB-LPMD |
now: FSB - LPMD, Faculty of Mechanical Engineering and naval architecture, Laboratory for precise measurement of length, Croatia, EURAMET |
| INM |
National Institute of Metrology, Romania, EURAMET |
| INMETRO |
Instituto Nacional de Metrologia, Qualidade e Tecnologia, Brazil, SIM |
| LNE |
Laboratoire national de métrologie et d'essais, France, EURAMET |
| METAS |
Federal Institute of Metrology, Switzerland, EURAMET |
| MIKES |
VTT Technical Research Centre of Finland Ltd, Centre for Metrology/Mittatekniikan keskus, Finland, EURAMET |
| MIRS/UM-FS/LTM |
MIRS/University of Maribor, Faculty for Mechanical Engineering/Laboratory for Production Management, Slovenia, EURAMET |
| MKEH |
Hungarian Trade Licensing Office; now BFKH, Hungary, EURAMET |
| NMISA |
National Metrology Institute of South Africa, South Africa, AFRIMETS |
| NPL |
National Physical Laboratory, United Kingdom, EURAMET |
| NRC |
National Research Council, Canada, SIM |
| NSAI NML |
NSAI National Metrology Laboratory, Ireland, EURAMET |
| PTB |
Physikalisch-Technische Bundesanstalt, Germany, EURAMET |
| SMD |
Service de la Métrologie Belge, Belgium, EURAMET |
| SP |
Technical Research Institute of Sweden from 2017 Research Institutes of Sweden AB, Sweden, EURAMET |
| UME |
TÜBITAK Ulusal Metroloji Enstitüsü, Türkiye, EURAMET |
| VSL |
VSL, Netherlands, EURAMET |
This page proposes print-out on A4 paper (portrait) of the comparison details (best printed out using a black and white printer).
Please, select items to be printed out, then click on "OK" :
MEASURAND : Internal diameter
GAUGE : 3.5/5 mm ring
|
The key comparison reference values, xR, were calculated in each group separately, based on the weighted mean, after excluding iteratively laboratories having a poor degree of equivalence until results were consistent. Group 1 : xR = 20.590 µm and uR = 0.017 µm |
|
For each group, the degrees of equivalence of laboratory i relative to the key comparison reference value is given by a pair of terms: Di = xi - xR and Ui its expanded uncertainty (k = 2). Linking of the two groups has been done by simply representing the results on a common graph, i.e. by setting the deviation from nominal value of the respective reference values of the two groups arbitrarily to zero. The consistency of the two linked groups with each other is demonstrated by the consistency of the linking laboratories (METAS, INRIM and NPL) with each of the reference values. |
| The pair-wise degrees of equivalence are not computed for this comparison. |
MEASURAND : Internal diameter
GAUGE : 40 mm ring
|
The key comparison reference values, xR, were calculated in each group separately, based on the weighted mean, after excluding iteratively laboratories having a poor degree of equivalence until results were consistent. Group 1 : xR = -0.183 µm and uR = 0.016 µm |
|
For each group, the degrees of equivalence of laboratory i relative to the key comparison reference value is given by a pair of terms: Di = xi - xR and Ui its expanded uncertainty (k = 2). Linking of the two groups has been done by simply representing the results on a common graph, i.e. by setting the deviation from nominal value of the respective reference values of the two groups arbitrarily to zero. The consistency of the two linked groups with each other is demonstrated by the consistency of the linking laboratories (METAS, INRIM and NPL) with each of the reference values. |
| The pair-wise degrees of equivalence are not computed for this comparison. |
MEASURAND : External diameter
GAUGE : 4/5 mm plug
|
The key comparison reference values, xR, were calculated in each group separately, based on the weighted mean, after excluding iteratively laboratories having a poor degree of equivalence until results were consistent. Group 1 : xR = 0.207 µm and uR = 0.015 µm |
|
For each group, the degrees of equivalence of laboratory i relative to the key comparison reference value is given by a pair of terms: Di = xi - xR and Ui its expanded uncertainty (k = 2). Linking of the two groups has been done by simply representing the results on a common graph, i.e. by setting the deviation from nominal value of the respective reference values of the two groups arbitrarily to zero. The consistency of the two linked groups with each other is demonstrated by the consistency of the linking laboratories (METAS and INRIM) with each of the reference values. |
| The pair-wise degrees of equivalence are not computed for this comparison. |
MEASURAND : External diameter
GAUGE : 50 mm plug
|
The key comparison reference values, xR, were calculated in each group separately, based on the weighted mean, after excluding iteratively laboratories having a poor degree of equivalence until results were consistent. Group 1 : xR = -0.270 µm and uR = 0.021 µm |
|
For each group, the degrees of equivalence of laboratory i relative to the key comparison reference value is given by a pair of terms: Di = xi - xR and Ui its expanded uncertainty (k = 2). Linking of the two groups has been done by simply representing the results on a common graph, i.e. by setting the deviation from nominal value of the respective reference values of the two groups arbitrarily to zero. The consistency of the two linked groups with each other is demonstrated by the consistency of the linking laboratories (METAS and INRIM) with each of the reference values. |
| The pair-wise degrees of equivalence are not computed for this comparison. |
MEASURAND : External diameter
GAUGE : 30 mm sphere
|
The key comparison reference values, xR, were calculated in each group separately, based on the weighted mean, after excluding iteratively laboratories having a poor degree of equivalence until results were consistent. Group 1 : xR = -11.896 µm and uR = 0.009 µm |
|
For each group, the degrees of equivalence of laboratory i relative to the key comparison reference value is given by a pair of terms: Di = xi - xR and Ui its expanded uncertainty (k = 2). Linking of the two groups has been done by simply representing the results on a common graph, i.e. by setting the deviation from nominal value of the respective reference values of the two groups arbitrarily to zero. The consistency of the two linked groups with each other is demonstrated by the consistency of the linking laboratories (METAS and INRIM) with each of the reference values. |
| The pair-wise degrees of equivalence are not computed for this comparison. |
MEASURAND : Internal diameter
GAUGE : 3.5/5 mm ring
xi : deviation from nominal length measured by laboratory i
ui : standard uncertainty of xi
The comparison was carried out in two groups of laboratories: Group 1 and Group 2
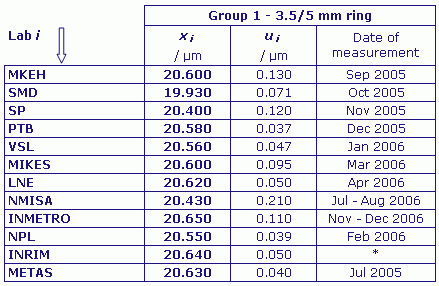
* June 2005, Jan & Nov - Dec 2007
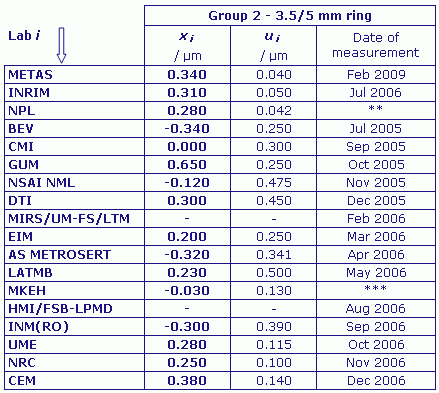
** Jan 2006 & Mar - Apr 2009
*** May - Jun 2005, Jun 2006, Jan 2007 & Sep 2008
MEASURAND : Internal diameter
GAUGE : 40 mm ring
xi : deviation from nominal length measured by laboratory i
ui : standard uncertainty of xi
The comparison was carried out in two groups of laboratories: Group 1 and Group 2
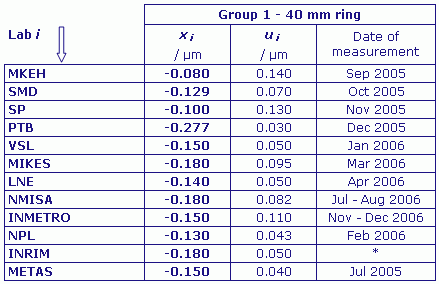
* June 2005, Jan & Nov - Dec 2007
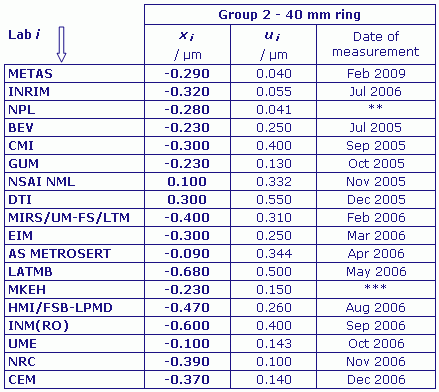
** Jan 2006 & Mar - Apr 2009
*** May - Jun 2005, Jun 2006, Jan 2007 & Sep 2008
MEASURAND : External diameter
GAUGE : 4/5 mm plug
xi : deviation from nominal length measured by laboratory i
ui : standard uncertainty of xi
The comparison was carried out in two groups of laboratories: Group 1 and Group 2
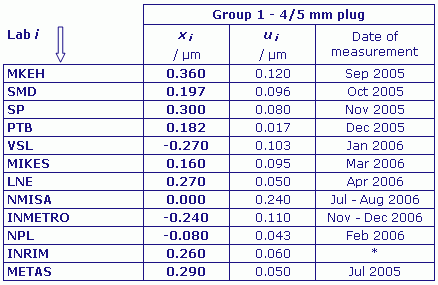
* June 2005, Jan & Nov - Dec 2007
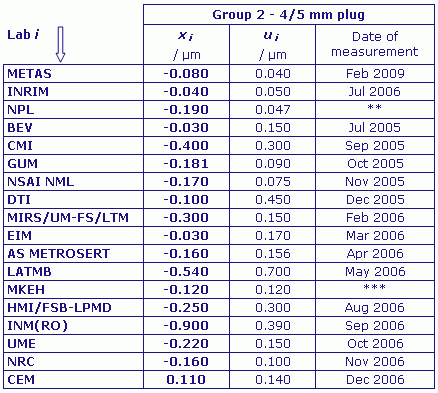
** Jan 2006 & Mar - Apr 2009
*** May - Jun 2005, Jun 2006, Jan 2007 & Sep 2008
MEASURAND : External diameter
GAUGE : 50 mm plug
xi : deviation from nominal length measured by laboratory i
ui : standard uncertainty of xi
The comparison was carried out in two groups of laboratories: Group 1 and Group 2
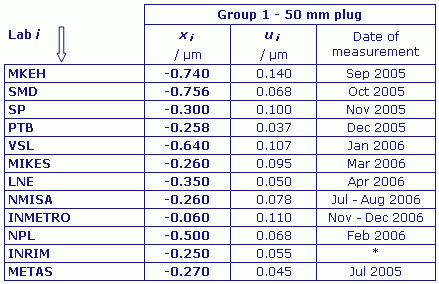
* June 2005, Jan & Nov - Dec 2007
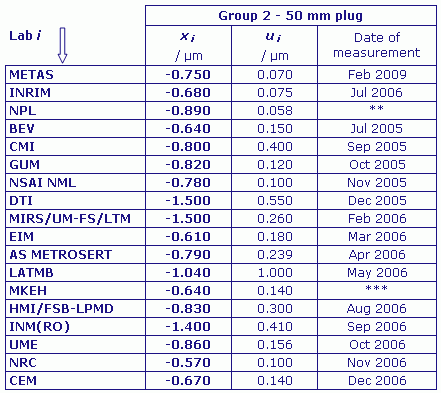
** Jan 2006 & Mar - Apr 2009
*** May - Jun 2005, Jun 2006, Jan 2007 & Sep 2008
MEASURAND : External diameter
GAUGE : 30 mm sphere
xi : deviation from nominal length measured by laboratory i
ui : standard uncertainty of xi
The comparison was carried out in two groups of laboratories: Group 1 and Group 2
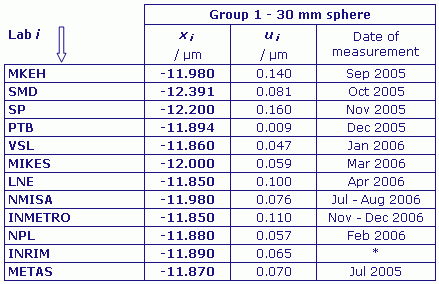
* June 2005, Jan & Nov - Dec 2007
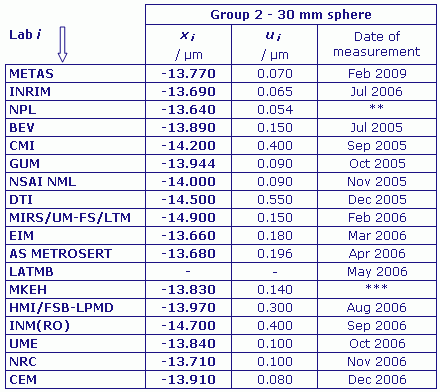
** Jan 2006 & Mar - Apr 2009
*** May - Jun 2005, Jun 2006, Jan 2007 & Sep 2008