

CCM.P-K4, EUROMET.M.P-K1.a, and EURAMET.M.P-K4.2010
MEASURAND : Pressure
NOMINAL VALUE : 3 Pa
Degrees of equivalence Di and expanded uncertainty Ui (95% level of confidence) expressed in Pa
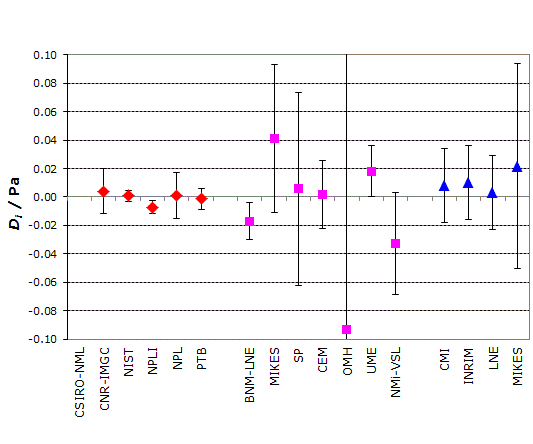
Red diamonds : participants in CCM.P-K4
Pink squares : participants in EUROMET.M.P-K1.a
Blue triangles : participants in EURAMET.M.P-K4.2010
Note: Information not apparent on the graph
- DCSIRO-NML = 0.30 Pa and UCSIRO-NML = 0.05 Pa,
- UOMH = 0.23 Pa
CCM.P-K4, EUROMET.M.P-K1.a, and EURAMET.M.P-K4.2010
MEASURAND : Pressure
NOMINAL VALUE : 10 Pa
Degrees of equivalence Di and expanded uncertainty Ui (95% level of confidence) expressed in Pa
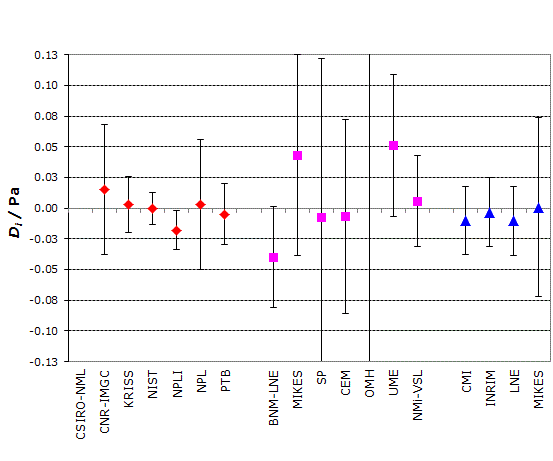
Red diamonds : participants in CCM.P-K4
Pink squares : participants in EUROMET.M.P-K1.a
Blue triangles : participants in EURAMET.M.P-K4.2010
Note: Information not apparent on the graph
- DCSIRO-NML = 0.57 Pa and UCSIRO-NML = 0.10 Pa,
- DOMH = 0.40 Pa and UOMH = 0.92 Pa
CCM.P-K4, EUROMET.M.P-K1.a, and EURAMET.M.P-K4.2010
MEASURAND : Pressure
NOMINAL VALUE : 30 Pa
Degrees of equivalence Di and expanded uncertainty Ui (95% level of confidence) expressed in Pa
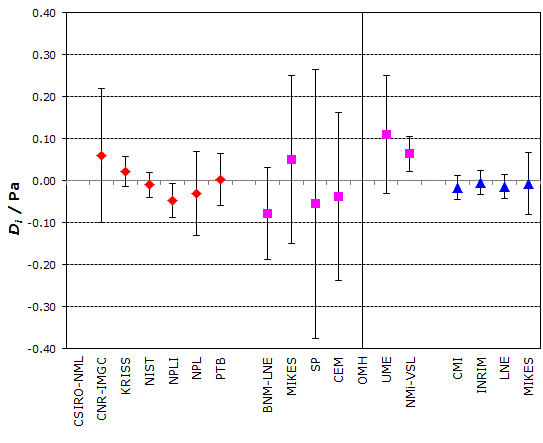
Red diamonds : participants in CCM.P-K4
Pink squares : participants in EUROMET.M.P-K1.a
Blue triangles : participants in EURAMET.M.P-K4.2010
Note: Information not apparent on the graph
- DCSIRO-NML = 0.91 Pa and UCSIRO-NML = 0.15 Pa,
- DOMH = 2.0 Pa and UOMH = 3.2 Pa
CCM.P-K2, EURAMET.M.P-K4.2010 and APMP.M.P-K9
MEASURAND Effective area of a piston-cylinder assembly
NOMINAL VALUE 335.7 mm2
NOMINAL PRESSURE 10 kPa
CCM.P-K2
Degrees of equivalence represented by Di = (xI - xR) and its expanded uncertainty Ui at a 95 % level of confidence, both expressed in mm2.
EURAMET.M.P-K4.2010 and APMP.M.P-K9
Degrees of equivalence represented by Di = (xI - xR) and its expanded uncertainty Ui at a 95 % level of confidence, both expressed in Pa.
CCM.P-K4, EUROMET.M.P-K1.a, and EURAMET.M.P-K4.2010
MEASURAND : Pressure
NOMINAL VALUE : 3 Pa
| Lab i | ||
| Di | Ui | |
| / Pa | / Pa | |
| CSIRO-NML | 0.301 | 0.052 |
| CNR-IMGC | 0.004 | 0.016 |
| NIST | 0.0008 | 0.0037 |
| NPLI | -0.0071 | 0.0049 |
| NPL | 0.001 | 0.016 |
| PTB | -0.0013 | 0.0075 |
| BNM-LNE | -0.017 | 0.013 |
| MIKES | 0.041 | 0.052 |
| SP | 0.0056 | 0.068 |
| CEM | 0.0020 | 0.024 |
| OMH | -0.093 | 0.23 |
| UME | 0.018 | 0.018 |
| NMi-VSL | -0.033 | 0.036 |
| CMI | 0.008 | 0.026 |
| INRIM | 0.010 | 0.026 |
| LNE | 0.003 | 0.026 |
| MIKES | 0.022 | 0.072 |
In pink: participants in EUROMET.M.P-K1.a.
In blue: participants in EURAMET.M.P-K4.2010.
No pair-wise degrees of equivalence are deduced from the measurements carried out in the framework of key comparison EUROMET.M.P-K1.a and EURAMET.M.P-K4.2010.
Results are presented under A4 printable format in Summary Results (.PDF file).
Unless otherwise stated, in the final numbers presented here, rounding has been applied according to ISO 80000-1:2009 Annex B Rule B.
CCM.P-K4, EUROMET.M.P-K1.a, and EURAMET.M.P-K4.2010
MEASURAND : Pressure
NOMINAL VALUE : 10 Pa
| Lab i | ||
| Di | Ui | |
| / Pa | / Pa | |
| CSIRO-NML | 0.57 | 0.10 |
| CNR-IMGC | 0.015 | 0.053 |
| KRISS | 0.003 | 0.023 |
| NIST | 0.000 | 0.013 |
| NPLI | -0.018 | 0.016 |
| NPL | 0.003 | 0.053 |
| PTB | -0.005 | 0.025 |
| BNM-LNE | -0.040 | 0.041 |
| MIKES | 0.043 | 0.082 |
| SP | -0.0080 | 0.13 |
| CEM | -0.0072 | 0.079 |
| OMH | -0.40 | 0.92 |
| UME | 0.051 | 0.058 |
| NMi-VSL | 0.0058 | 0.037 |
| CMI | -0.010 | 0.028 |
| INRIM | -0.003 | 0.028 |
| LNE | -0.010 | 0.028 |
| MIKES | 0.001 | 0.073 |
In pink: participants in EUROMET.M.P-K1.a.
In blue: participants in EURAMET.M.P-K4.2010.
No pair-wise degrees of equivalence are deduced from the measurements carried out in the framework of key comparison EUROMET.M.P-K1.a and EURAMET.M.P-K4.2010.
Results are presented under A4 printable format in Summary Results (.PDF file).
Unless otherwise stated, in the final numbers presented here, rounding has been applied according to ISO 80000-1:2009 Annex B Rule B.
CCM.P-K4, EUROMET.M.P-K1.a, and EURAMET.M.P-K4.2010
MEASURAND : Pressure
NOMINAL VALUE : 30 Pa
| Lab i | ||
| Di | Ui | |
| / Pa | / Pa | |
| CSIRO-NML | 0.91 | 0.15 |
| CNR-IMGC | 0.06 | 0.16 |
| KRISS | 0.022 | 0.035 |
| NIST | -0.010 | 0.029 |
| NPLI | -0.047 | 0.041 |
| NPL | -0.03 | 0.10 |
| PTB | 0.002 | 0.062 |
| BNM-LNE | -0.078 | 0.11 |
| MIKES | 0.050 | 0.20 |
| SP | -0.055 | 0.32 |
| CEM | -0.037 | 0.20 |
| OMH | 2.0 | 3.2 |
| UME | 0.11 | 0.14 |
| NMi-VSL | 0.064 | 0.042 |
| CMI | -0.016 | 0.028 |
| INRIM | -0.004 | 0.028 |
| LNE | -0.014 | 0.028 |
| MIKES | -0.007 | 0.074 |
In pink: participants in EUROMET.M.P-K1.a.
In blue: participants in EURAMET.M.P-K4.2010.
No pair-wise degrees of equivalence are deduced from the measurements carried out in the framework of key comparison EUROMET.M.P-K1.a and EURAMET.M.P-K4.2010.
Results are presented under A4 printable format in Summary Results (.PDF file).
Unless otherwise stated, in the final numbers presented here, rounding has been applied according to ISO 80000-1:2009 Annex B Rule B.
CCM.P-K2, EURAMET.M.P-K4.2010 and APMP.M.P-K9
MEASURAND Effective area of a piston-cylinder assembly
NOMINAL VALUE 335.7 mm2
NOMINAL PRESSURE 10 kPa
CCM.P-K2
Degrees of equivalence represented by Di = (xI - xR) and its expanded uncertainty Ui at a 95 % level of confidence, both expressed in mm2.
EURAMET.M.P-K4.2010 and APMP.M.P-K9
Degrees of equivalence represented by Di = (xI - xR) and its expanded uncertainty Ui at a 95 % level of confidence, both expressed in Pa.
| Metrology area, Sub-field | Mass and related quantities, Pressure |
| Description | Pressure measurements in gas (absolute and gauge mode) |
| Time of measurements | 2008 - 2012 |
| Status | Approved for equivalence |
| References | |
| Measurand | Pressure: 1 Pa (optional), 3 Pa, 10 Pa, 30 Pa, 100 Pa, 300 Pa, 1 kPa, 3 kPa, 10 kPa and 15 kPa, absolute mode |
| Transfer device | Digital non-rotating piston gauge |
| Comparison type | Key Comparison |
| Consultative Committee | CCM (Consultative Committee for Mass and Related Quantities) |
| Conducted by | EURAMET (European Association of National Metrology Institutes) |
| RMO Internal Identifier | EURAMET Project No 1047 |
| Comments | Results published on 15 April 2014 EURAMET.M.P-K4.2010 is linked to CCM.P-K4 for nominal pressures of 3 Pa, 10 Pa and 30 Pa. In addition, EURAMET.M.P-K4.2010 results are linked to those of CCM.P-K2 for nominal pressure of 10 kPa. |
| Pilot institute |
CMI
Czech Metrology Institute Czechia |
| Contact person | D. Prazak +420 545 555 226 |
| Pilot laboratory | |
|---|---|
| CMI |
Czech Metrology Institute, Czechia, EURAMET |
| INRIM |
Istituto Nazionale di Ricerca Metrologica, Italy, EURAMET |
| LNE |
Laboratoire national de métrologie et d'essais, France, EURAMET |
| MIKES |
VTT Technical Research Centre of Finland Ltd, Centre for Metrology/Mittatekniikan keskus, Finland, EURAMET |
| PTB |
Physikalisch-Technische Bundesanstalt, Germany, EURAMET |
This page proposes print-out on A4 paper (portrait) of the comparison details (best printed out using a black and white printer).
Please, select items to be printed out, then click on "OK" :
CCM.P-K4, EUROMET.M.P-K1.a, and EURAMET.M.P-K4.2010
MEASURAND : Pressure
NOMINAL VALUE : 3 Pa
|
The key comparison reference value, pR, is obtained from an unweighted mean of the measurement method means (outliers excluded). A correction is applied to set pR numerically equal to the nominal pressure (see CCM.P-K4 Final Report, page 41). |
| The degree of equivalence of each laboratory with respect to the reference value is given by a pair of terms: Di = (pi - pR) and Ui, its expanded uncertainty at a 95% level of confidence, both expressed in Pa. |
| The degree of equivalence between two laboratories is given by a pair of terms: Dij = Di - Dj = (pi - pj) and Uij, its expanded uncertainty at 95% level of confidence, both expressed in Pa. |
The results of EUROMET.M.P-K1.a are linked to those of CCM.P-K4 for 7 pressure nominal values in the range 1 Pa to 1000 Pa, through the common participation of three laboratories: CNR-IMGC, PTB, and NPL.
The CNR-IMGC, however, does not participate in the linking process in the pressure range 100 Pa to 1000 Pa, because it did not use a Static Expansion System for that range of measurements in CCM.P-K4.
The detailed calculation used in the linking process is presented on pages 20 and 21 of the EUROMET.M.P-K1.a Final report.
| The degrees of equivalence of laboratories having participated in EUROMET.M.P-K1.a only (plus those of CNR-IMGC in the range 100 Pa to 1000 Pa) relative to the CCM.P-K4 key comparison reference values are obtained from the linking process and are given in table 11 on page 22 of the EUROMET.M.P-K1.a Final Report. |
| No pair-wise degrees of equivalence are deduced from the measurements carried out in the framework of key comparison EUROMET.M.P-K1.a. |
PTB provides the link between key comparisons CCM.P-K4 and EURAMET.M.P-K4.2010 for nominal pressures 3 Pa, 10 Pa, and 30 Pa.
The linkage process is described in Section 11 of the EURAMET.M.P-K4.2010 Final Report.
CCM.P-K4, EUROMET.M.P-K1.a, and EURAMET.M.P-K4.2010
MEASURAND : Pressure
NOMINAL VALUE : 10 Pa
|
The key comparison reference value, pR, is obtained from an unweighted mean of the measurement method means (outliers excluded). A correction is applied to set pR numerically equal to the nominal pressure (see CCM.P-K4 Final Report, page 41). The combined standard uncertainty of pR is uR (see CCM.P-K4 Final Report, page 42). |
| The degree of equivalence of each laboratory with respect to the reference value is given by a pair of terms: Di = (pi - pR) and Ui, its expanded uncertainty at a 95% level of confidence, both expressed in Pa. |
| The degree of equivalence between two laboratories is given by a pair of terms: Dij = Di - Dj = (pi - pj) and Uij, its expanded uncertainty at 95% level of confidence, both expressed in Pa. |
The results of EUROMET.M.P-K1.a are linked to those of CCM.P-K4 for 7 pressure nominal values in the range 1 Pa to 1000 Pa, through the common participation of three laboratories: CNR-IMGC, PTB, and NPL.
The CNR-IMGC, however, does not participate in the linking process in the pressure range 100 Pa to 1000 Pa, because it did not use a Static Expansion System for that range of measurements in CCM.P-K4.
The detailed calculation used in the linking process in presented on pages 20 and 21 of the EUROMET.M.P-K1.a Final report.
| The degrees of equivalence of laboratories having participated in EUROMET.M.P-K1.a only (plus those of CNR-IMGC in the range 100 Pa to 1000 Pa) relative to the CCM.P-K4 key comparison reference values are obtained from the linking process and are given in table 11 on page 22 of the EUROMET.M.P-K1.a Final Report. |
| No pair-wise degrees of equivalence are deduced from the measurements carried out in the framework of key comparison EUROMET.M.P-K1.a. |
PTB provides the link between key comparisons CCM.P-K4 and EURAMET.M.P-K4.2010 for nominal pressures 3 Pa, 10 Pa, and 30 Pa.
The linkage process is described in Section 11 of the EURAMET.M.P-K4.2010 Final Report.
CCM.P-K4, EUROMET.M.P-K1.a, and EURAMET.M.P-K4.2010
MEASURAND : Pressure
NOMINAL VALUE : 30 Pa
|
The key comparison reference value, pR, is obtained from an unweighted mean of the measurement method means (outliers excluded). A correction is applied to set pR numerically equal to the nominal pressure (see CCM.P-K4 Final Report, page 41). The combined standard uncertainty of pR is uR (see CCM.P-K4 Final Report, page 42). |
| The degree of equivalence of each laboratory with respect to the reference value is given by a pair of terms: Di = (pi - pR) and Ui, its expanded uncertainty at a 95% level of confidence, both expressed in Pa. |
| The degree of equivalence between two laboratories is given by a pair of terms: Dij = Di - Dj = (pi - pj) and Uij, its expanded uncertainty at 95% level of confidence, both expressed in Pa. |
The results of EUROMET.M.P-K1.a are linked to those of CCM.P-K4 for 7 pressure nominal values in the range 1 Pa to 1000 Pa, through the common participation of three laboratories: CNR-IMGC, PTB, and NPL.
The CNR-IMGC, however, does not participate in the linking process in the pressure range 100 Pa to 1000 Pa, because it did not use a Static Expansion System for that range of measurements in CCM.P-K4.
The detailed calculation used in the linking process in presented on pages 20 and 21 of the EUROMET.M.P-K1.a Final report.
| The degrees of equivalence of laboratories having participated in EUROMET.M.P-K1.a only (plus those of CNR-IMGC in the range 100 Pa to 1000 Pa) relative to the CCM.P-K4 key comparison reference values are obtained from the linking process and are given in table 11 on page 22 of the EUROMET.M.P-K1.a Final Report. |
| No pair-wise degrees of equivalence are deduced from the measurements carried out in the framework of key comparison EUROMET.M.P-K1.a. |
PTB provides the link between key comparisons CCM.P-K4 and EURAMET.M.P-K4.2010 for nominal pressures 3 Pa, 10 Pa, and 30 Pa.
The linkage process is described in Section 11 of the EURAMET.M.P-K4.2010 Final Report.
CCM.P-K2, EURAMET.M.P-K4.2010 and APMP.M.P-K9
MEASURAND Effective area of a piston-cylinder assembly
NOMINAL VALUE 335.7 mm2
NOMINAL PRESSURE 10 kPa
CCM.P-K2
The key comparison reference value, xR, is calculated as the median of the participants' values. The standard uncertainty of the key comparison reference value, uR, is calculated by the formula uR = 1.858 MAD / (n - 1)1/2, where MAD is the median of absolute deviations from the median, and n is the number of participants contributing to the reference value.
xR = 335.744 4 mm2
uR = 0.000 9 mm2
The degree of equivalence of laboratory i with respect to the key comparison reference value is given by a pair of terms expressed in mm2:
Di = (xi - xR) and Ui = 2(ui2 + uR2 + uT2)1/2, its expanded uncertainty (k = 2). uT is the uncertainty due to the instability of the transfer standard: uT = 0.002 5 mm2 (see page 15 of the Final Report).
The degree of equivalence between two laboratories i and j is given by a pair of terms expressed in mm2: Dij = Di - Dj = (xi - xj) and Uij = 2(ui2 + uj2 + 2uT2)1/2, its expanded uncertainty (k = 2). Effects of correlation should be taken into consideration.
Linking EURAMET.M.P-K4.2010 to CCM.P-K2
PTB provides the link between key comparisons CCM.P-K2 and EURAMET.M.P-K4.2010, having participated in both comparisons. The linkage process is described in Section 11 of the EURAMET.M.P-K4.2010 Final Report.
The degrees of equivalence of the laboratories having participated in EURAMET.M.P-K4.2010, with respect to the CCM.P-K2 key comparison reference value, are expressed in Pa, and therefore are shown on a different graph from the one for the participants in CCM.P-K2.
Linking APMP.M.P-K9 to CCM.P-K2
NMIA and PTB provides the link between key comparisons CCM.P-K2 and APMP.M.P-K9, having participated in both comparisons. The linkage process is described in Section 6 of the APMP.M.P-K9 Final Report.
The degrees of equivalence of the laboratories having participated in APMP.M.P-K9, with respect to the CCM.P-K2 key comparison reference value, are expressed in Pa, and therefore are shown on a different graph from the one for the participants in CCM.P-K2.
CCM.P-K4, EUROMET.M.P-K1.a, and EURAMET.M.P-K4.2010
MEASURAND : Pressure
NOMINAL PRESSURE : 3 Pa
pi : corrected mean gauge reading obtained by laboratory i
ui : combined standard uncertainty of pi
Further information on pi and ui may be found respectively on page 15 and page 22 of CCM.P-K4 Final Report.
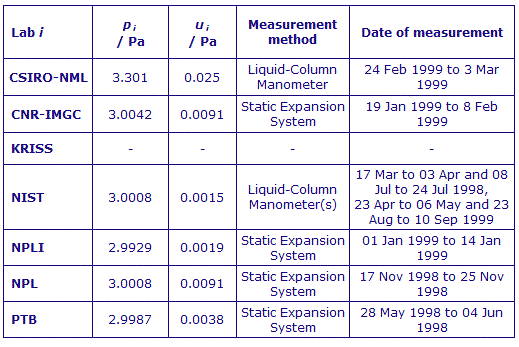
The laboratory individual measurements of the participants in EUROMET.M.P-K1.a are given in Table 7 and 8 on pages 17, 18, and 19 of the EUROMET.M.P-K1.a Final Report.
All measurements used a Static Expansion System and were carried out between September 1998 and April 2004.
The laboratory individual measurements of the participants in the key comparison EURAMET.M.P-K4.2010 are given in Table 10.7a on page 23 of the EURAMET.M.P-K4.2010 Final Report.
Unless otherwise stated, in the final numbers presented here, rounding has been applied according to ISO 80000-1:2009 Annex B Rule B.
CCM.P-K4, EUROMET.M.P-K1.a, and EURAMET.M.P-K4.2010
MEASURAND : Pressure
NOMINAL PRESSURE : 10 Pa
pi : corrected mean gauge reading obtained by laboratory i
ui : combined standard uncertainty of pi
Further information on pi and ui may be found respectively on page 15 and page 22 of CCM.P-K4 Final Report.
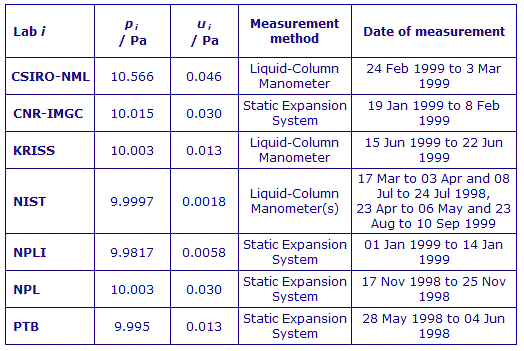
The laboratory individual measurements of the participants in EUROMET.M.P-K1.a are given in Table 7 and 8 on pages 17, 18, and 19 of the EUROMET.M.P-K1.a Final Report.
All measurements used a Static Expansion System and were carried out between September 1998 and April 2004.
The laboratory individual measurements of the participants in the key comparison EURAMET.M.P-K4.2010 are given in Table 10.7a on page 23 of the EURAMET.M.P-K4.2010 Final Report.
Unless otherwise stated, in the final numbers presented here, rounding has been applied according to ISO 80000-1:2009 Annex B Rule B.
CCM.P-K4, EUROMET.M.P-K1.a, and EURAMET.M.P-K4.2010
MEASURAND : Pressure
NOMINAL PRESSURE : 30 Pa
pi : corrected mean gauge reading obtained by laboratory i
ui : combined standard uncertainty of pi
Further information on pi and ui may be found respectively on page 15 and page 22 of CCM.P-K4 Final Report.
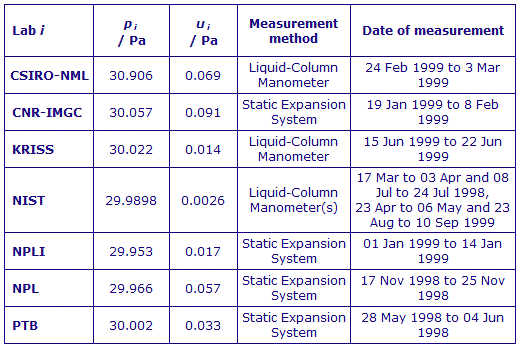
The laboratory individual measurements of the participants in EUROMET.M.P-K1.a are given in Table 7 and 8 on pages 17, 18, and 19 of the EUROMET.M.P-K1.a Final Report.
All measurements used a Static Expansion System and were carried out between September 1998 and April 2004.
The laboratory individual measurements of the participants in the key comparison EURAMET.M.P-K4.2010 are given in Table 10.7a on page 23 of the EURAMET.M.P-K4.2010 Final Report.
Unless otherwise stated, in the final numbers presented here, rounding has been applied according to ISO 80000-1:2009 Annex B Rule B.
CCM.P-K2, EURAMET.M.P-K4.2010 and APMP.M.P-K9
MEASURAND Effective area of a piston-cylinder assembly
NOMINAL VALUE 335.7 mm2
NOMINAL PRESSURE 10 kPa
xi results obtained by laboratory i, Labi
ui combined standard uncertainty of xi