

MEASURAND : Central length of long gauge blocks measured by interferometry according to ISO 3650; gauge block material: steel NOMINAL VALUES : 6 gauge blocks from 150 mm to 900 mm, including three different 500 mm gauge blocks and two different 900 mm gauge blocks Degrees of equivalence, Di and expanded uncertainty Ui, of each laboratory i with respect to the reference value for each gauge block k (k = 1 to 6), expressed in nm L1 = 150 mm, S/N 8728 L2 = 500 mm, S/N AA/71001 L3 = 500 mm, S/N 500 B L4 = 900 mm, S/N EM/718 L5 = 500 mm, S/N 4 PTB 55 L6 = 900 mm, S/N PTB 5.13 11/2001 Note: UVMT/VMC = 1379 nm for L6 = 900 mm, S/N PTB 5.13 11/2001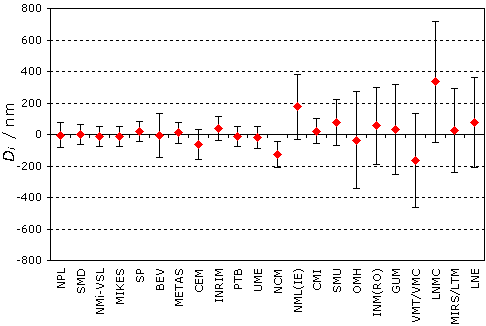
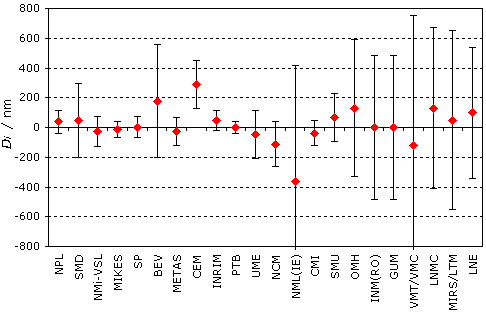
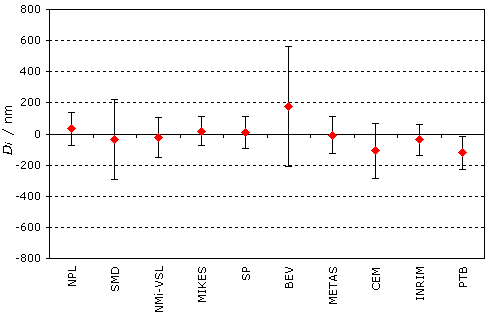
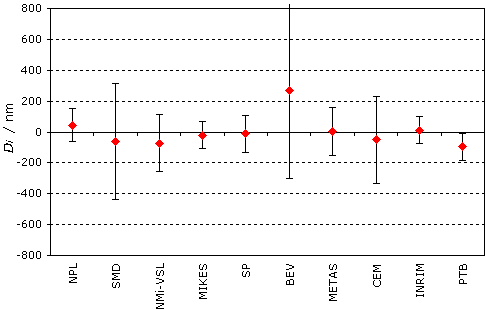
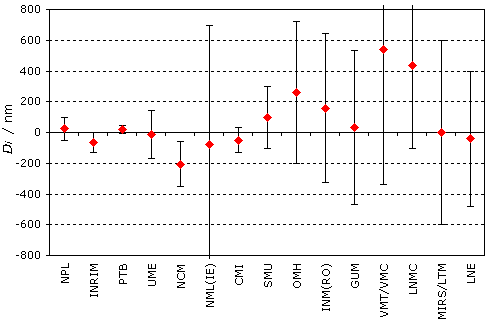
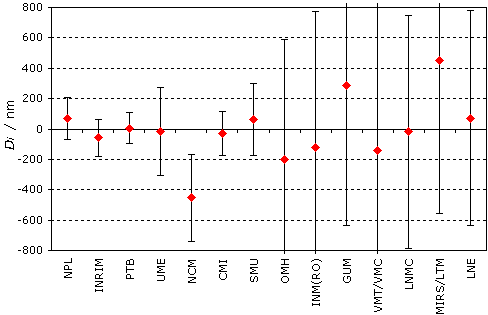
MEASURAND : Central length of long gauge blocks measured by interferometry according to ISO 3650; gauge block material: steel
NOMINAL VALUES : 6 gauge blocks from 150 mm to 900 mm, including three different 500 mm gauge blocks and two different 900 mm gauge blocks
Degrees of equivalence, Di and expanded uncertainty Ui, for each nominal length.
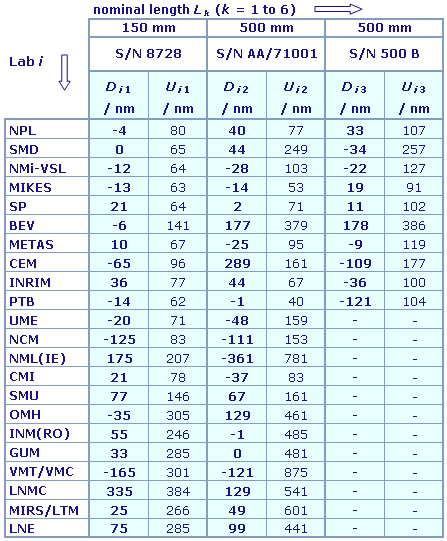
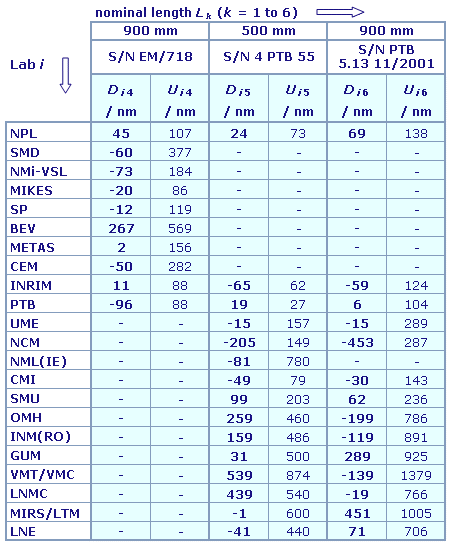
Results are presented under A4 printable format in Summary Results (.PDF file).
| Metrology area, Sub-field | Length, Dimensional Metrology |
| Description | Long gauge blocks from 150 mm to 900 mm |
| Time of measurements | 2002 - 2005 |
| Status | Approved for equivalence |
| Final Reports of the comparisons | |
| Measurand | Central length: 150 mm, 500 mm and 900 mm |
| Transfer device | Six steel gauge blocks |
| Comparison type | Key Comparison |
| Consultative Committee | CCL (Consultative Committee for Length ) |
| Conducted by | EURAMET (European Association of National Metrology Institutes) |
| RMO Internal Identifier | EUROMET Project No 602 |
| Comments | Results published on 02 May 2006 Long gauge blocks by interferometry |
| Pilot institute |
NPL
National Physical Laboratory United Kingdom |
| Contact person | Andrew Lewis +44 (0) 20 8943 6074 |
| Pilot laboratory | |
|---|---|
| NPL |
National Physical Laboratory, United Kingdom, EURAMET |
| BEV |
Bundesamt für Eich- und Vermessungswesen, Austria, EURAMET |
| CEM |
Centro Español de Metrologia, Spain, EURAMET |
| CMI |
Czech Metrology Institute, Czechia, EURAMET |
| GUM |
Glowny Urzad Miar, Central Office of Measures, Poland, EURAMET |
| INM |
National Institute of Metrology, Romania, EURAMET |
| INRIM |
Istituto Nazionale di Ricerca Metrologica, Italy, EURAMET |
| IPQ |
Instituto Portugues da Qualidade, Portugal, EURAMET |
| LNE |
Laboratoire national de métrologie et d'essais, France, EURAMET |
| METAS |
Federal Institute of Metrology, Switzerland, EURAMET |
| MIKES |
VTT Technical Research Centre of Finland Ltd, Centre for Metrology/Mittatekniikan keskus, Finland, EURAMET |
| MIRS/LTM |
Metrology Institute of Republic of Slovenia / Laboratory for Production Measurement, Slovenia, EURAMET |
| NCM |
National Centre of Metrology, now BIM (Bulgarian Institute of Metrology), Bulgaria, EURAMET |
| NML(IE) |
National Metrology Laboratory of Ireland; now NSAI National Metrology Laboratory, NSAI NML, Ireland, EURAMET |
| NMi-VSL |
Nederlands Meetinstituut - Van Swinden Laboratorium (became VSL in 2009), Netherlands, EURAMET |
| OMH |
Országos Mérésügyi Hivatal; Subsequently MKEH, now BKFH, Hungary, EURAMET |
| PTB |
Physikalisch-Technische Bundesanstalt, Germany, EURAMET |
| SMD |
Service de la Métrologie Belge, Belgium, EURAMET |
| SMU |
Slovensky Metrologicky Ustav, Slovakia, EURAMET |
| SP |
Technical Research Institute of Sweden from 2017 Research Institutes of Sweden AB, Sweden, EURAMET |
| UME |
TÜBITAK Ulusal Metroloji Enstitüsü, Türkiye, EURAMET |
| VMT/VMC |
State Metrology Service / Vilnius Metrology Center, now Vilnius Metrology Center/VI Vilniaus metrologijos centras, VMC, Lithuania, EURAMET |
This page proposes print-out on A4 paper (portrait) of the comparison details (best printed out using a black and white printer).
Please, select items to be printed out, then click on "OK" :
MEASURAND : Central length of long gauge blocks measured by interferometry according to ISO 3650; gauge block material: steel
NOMINAL VALUES : 6 gauge blocks from 150 mm to 900 mm, including three different 500 mm gauge blocks and two different 900 mm gauge blocks
|
The EUROMET key comparison reference value, xRk, for each gauge block k is obtained from the weighted mean xwk (with weights wik based on each reported uncertainty) of the participants' values xik by adding a constant Ck chosen such that the reference value is the nominal length: xRk = Lk = xwk + Ck. |
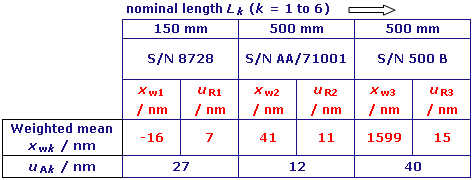
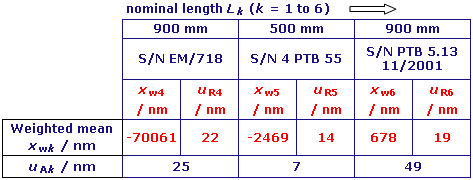
|
The degree of equivalence of each laboratory with respect to the reference value for each gauge block k is given by a pair of terms: the difference Dik and its expanded uncertainty Uik (coverage factor: 2) with |
|
The calculation of the degree of equivalence between two laboratories i and j is not recommended for comparisons involving several material standards, since it cannot be expressed with a single pair of terms. It would have to be calculated separately for each gauge block k and would then be given by a pair of terms: |
Key comparison EUROMET.L-K2 is parallel to key comparison CCL-K2. Numerical linking of these comparisons is not recommended due to artefact dependent offsets. Instead, laboratories participating competently in both key comparisons establish the link and assure equivalence.
MEASURAND : Central length of long gauge blocks measured by interferometry according to ISO 3650; gauge block material: steel
NOMINAL VALUES : 6 gauge blocks from 150 mm to 900 mm, including three different 500 mm gauge blocks and two different 900 mm gauge blocks
xik : result of measurement carried out by laboratory i for gauge block k with nominal length Lk, expressed as the deviation from nominal length in nm
uik : combined standard uncertainty of xik reported by laboratory i
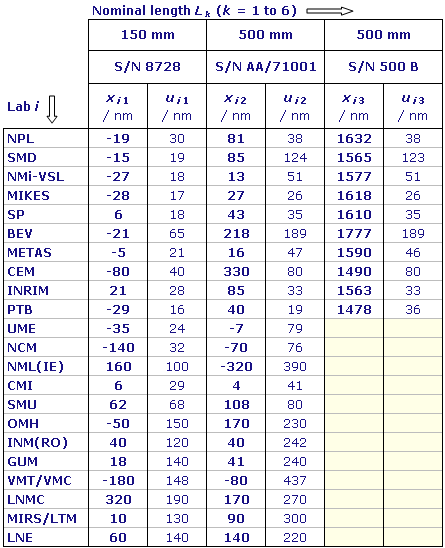
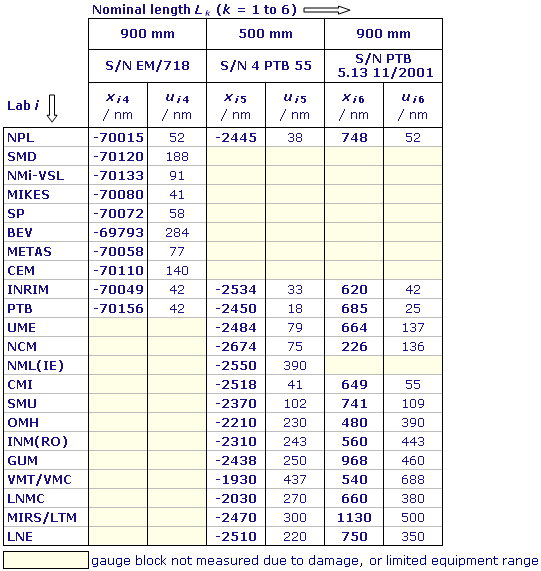
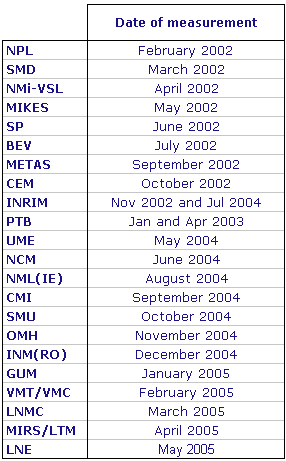
Results of IPQ were withdrawn by the laboratory as not representative of their instrument, which was still being developed.