
MEASURAND : Central length of steel gauge blocks measured by interferometry according to ISO 3650
NOMINAL VALUES : 9 gauge blocks with nominal length Lk (k = 1 to 9) from 0.5 mm to 100 mm
Degrees of equivalence, Dik and expanded uncertainty Uik (k = 2), of each laboratory i with respect to the reference value for each gauge block k.
Click on the graph of your interest for a closer look.
|
L1 = 0.5 mm |
L2 = 1.01 mm |
|
L3 = 6 mm |
L4 = 7 mm |
|
L5 = 8 mm |
L6 = 15 mm |
|
L7 = 80 mm |
L8 = 90 mm |
|
L9 = 100 mm |
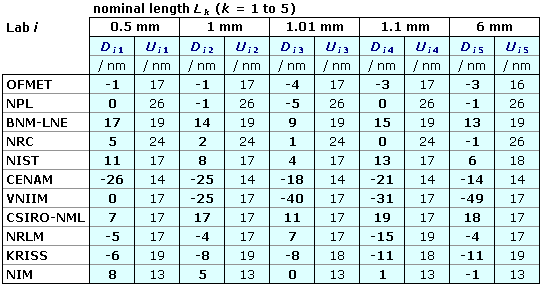
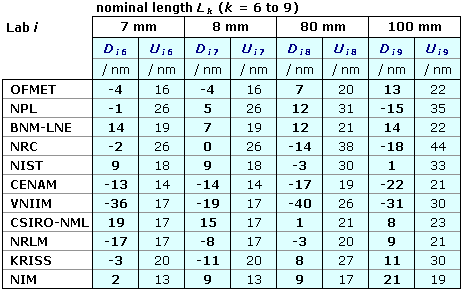
MEASURAND : Central length of tunsgten carbide gauge blocks measured by interferometry according to ISO 3650
NOMINAL VALUES : 9 gauge blocks with nominal length Lk (k = 1 to 9) from 0.5 mm to 100 mm
Degrees of equivalence, Dik and expanded uncertainty Uik (k = 2), of each laboratory i with respect to the reference value for each gauge block k.
Click on the graph of your interest for a closer look.
L1 = 0.5 mm L2 = 1 mm L3 = 1.01 mm L4 = 1.1 mm L5 = 6 mm L6 = 7 mm L7 = 8 mm L8 = 80 mm L9 = 100 mm
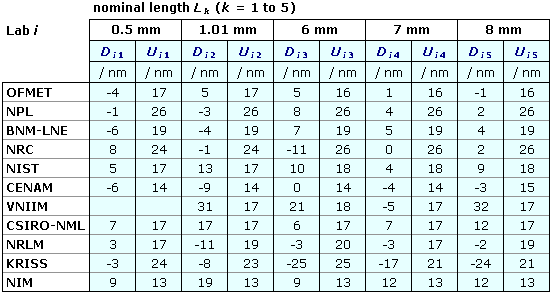
MEASURAND : Central length of steel gauge blocks measured by interferometry according to ISO 3650.
NOMINAL VALUES : 9 gauge blocks from 0.5 mm to 100 mm
Degrees of equivalence, Dik and expanded uncertainty Uik, for each nominal length Lk (k = 1 to 9).
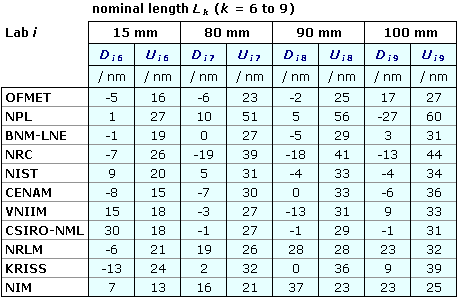
MEASURAND : Central length of tungsten carbide gauge blocks measured by interferometry according to ISO 3650
NOMINAL VALUES : 9 gauge blocks from 0.5 mm to 100 mm
Degree of Equivalence, Dik and expanded uncertainty Uik, for each nominal length Lk (k = 1 to 9).
| Metrology area, Sub-field | Length, Dimensional Metrology |
| Description | Gauge blocks by interferometry |
| Time of measurements | 1998 - 1999 |
| Status | Approved for equivalence |
| References | |
| Measurand | Central length: 0.5 mm to 100 mm |
| Transfer device | Steel and tungsten carbide gauge blocks |
| Comparison type | Key Comparison |
| Consultative Committee | CCL (Consultative Committee for Length ) |
| Conducted by | CCL (Consultative Committee for Length ) |
| Comments | The central length of gauge blocks is measured by interferometry according to ISO 3650. Results published on 31 August 2001 Gauge blocks by interferometry |
| Pilot institute |
METAS
Federal Institute of Metrology Switzerland |
| Contact person | R. Thalmann +41 58 387 03 85 |
| Pilot laboratory | |
|---|---|
| METAS |
Federal Institute of Metrology, Switzerland, EURAMET |
| BNM-LNE |
Bureau National de Métrologie - Laboratoire National d'Essais, France, EURAMET |
| CENAM |
Centro Nacional de Metrologia, Mexico, SIM |
| CSIRO-NML (now NMIA) |
Commonwealth Scientific and Industrial Research Organization - National Measurement Laboratory; became National Measurement Institute, Australia, NMIA in 2004, Australia, APMP |
| KRISS |
Korea Research Institute of Standards and Science, Korea, Republic of, APMP |
| NIM |
National Institute of Metrology, China, APMP |
| NIST |
National Institute of Standards and Technology, United States, SIM |
| NMIJ AIST |
National Metrology Institute of Japan, Japan, APMP |
| NPL |
National Physical Laboratory, United Kingdom, EURAMET |
| NRC |
National Research Council, Canada, SIM |
| VNIIM |
D.I. Mendeleyev Institute for Metrology, Rosstandart, Russian Federation, COOMET |
This page proposes print-out on A4 paper (portrait) of the comparison details (best printed out using a black and white printer).
Please, select items to be printed out, then click on "OK" :
MEASURAND : Central length of steel gauge blocks measured by interferometry according to ISO 3650
NOMINAL VALUES : 9 gauge blocks from 0.5 mm to 100 mm
|
The key comparison reference value xRk for each gauge block k is obtained from the arithmetic mean xak of the participants values xik by adding a constant Ck chosen such that the reference value is the nominal length Lk = xak + Ck. |
| The degree of equivalence of each laboratory with respect to the reference value of each gauge block k is given by a pair of terms: the difference Dik and its expanded uncertainty Uik (coverage factor: 2), see equations below. |
| nominal length Lk (k = 1 to 5) | ||||||||||
| 0.5 mm | 1.01 mm | 6 mm | 7 mm | 8 mm | ||||||
| xa1 | uR1 | xa2 | uR2 | xa3 | uR3 | xa4 | uR4 | xa5 | uR5 | |
| / nm | / nm | / nm | / nm | / nm | / nm | / nm | / nm | / nm | / nm | |
| Mean values | 21.4 | 3.5 | 28.7 | 3.5 | 46.6 | 3.6 | 29.6 | 3.5 | -0.2 | 3.5 |
| nominal length Lk (k = 6 to 9) | ||||||||
| 15 mm | 80 mm | 90 mm | 100 mm | |||||
| xa6 | uR6 | xa7 | uR7 | xa8 | uR8 | xa9 | uR9 | |
| / nm | / nm | / nm | / nm | / nm | / nm | / nm | / nm | |
| Mean values | 21.1 | 3.7 | 28.5 | 5.8 | -18.6 | 6.3 | -112.9 | 6.8 |
| The calculation of the degree of equivalence between two laboratories i and j is not recommended for comparisons involving several material standards, since it cannot be expressed with a single pair of terms. It would have to be calculated separately for each gauge block k and would then be given by a pair of terms: the difference Dijk and its expanded uncertainty Uijk (coverage factor: 2), see equations below. |
The following table gives the equations that define the parameters given above:
.gif) |
.gif) |
 |
.gif) |
.gif) |
.gif) |
MEASURAND : Central length of tungsten carbide gauge blocks measured by interferometry according to ISO 3650
NOMINAL VALUES : 9 gauge blocks from 0.5 mm to 100 mm
|
The key comparison reference value xRk for each gauge block k is obtained from the arithmetic mean xak of the participants values xik by adding a constant Ck chosen such that the reference value is the nominal length Lk = xak + Ck. |
| The degree of equivalence of each laboratory with respect to the reference value of each gauge block k is given by a pair of terms: the difference Dik and its expanded uncertainty Uik (coverage factor: 2), see equations below. |
| nominal length Lk (k = 1 to 5) | ||||||||||
| 0.5 mm | 1 mm | 1.01 mm | 1.1 mm | 6 mm | ||||||
| xa1 | uR1 | xa2 | uR2 | xa3 | uR3 | xa4 | uR4 | xa5 | uR5 | |
| / nm | / nm | / nm | / nm | / nm | / nm | / nm | / nm | / nm | / nm | |
| Mean values | 24.2 | 3.4 | 16.4 | 3.4 | 27.6 | 3.4 | -51.4 | 3.4 | -46.6 | 3.4 |
| nominal length Lk (k = 6 to 9) | ||||||||
| 7 mm | 8 mm | 80 mm | 100 mm | |||||
| xa6 | uR6 | xa7 | uR7 | xa8 | uR8 | xa9 | uR9 | |
| / nm | / nm | / nm | / nm | / nm | / nm | / nm | / nm | |
| Mean values | 30.2 | 3.4 | 48.7 | 3.5 | 104.4 | 4.6 | -78.8 | 5.1 |
| The calculation of the degree of equivalence between two laboratories i and j is not recommended for comparisons involving several material standards, since it cannot be expressed with a single pair of terms. It would have to be calculated separately for each gauge block k and would then be given by a pair of terms: the difference Dijk and its expanded uncertainty Uijk (coverage factor: 2), see equations below. |
The following table gives the equations that define the parameters given above:
.gif) |
.gif) |
 |
.gif) |
.gif) |
.gif) |
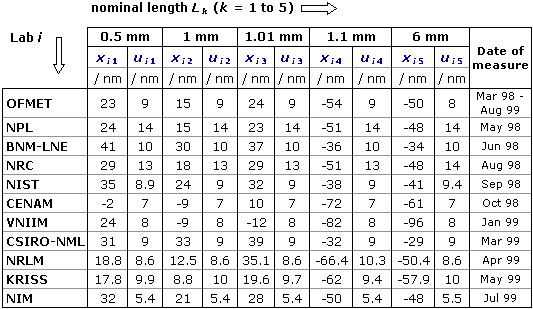
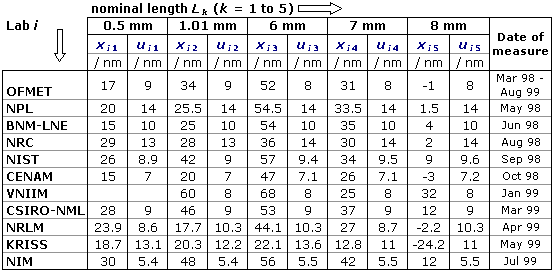
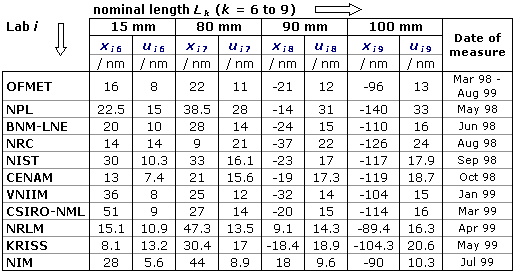
MEASURAND : Central length of steel gauge blocks measured by interferometry according to ISO 3650
NOMINAL VALUES : 9 gauge blocks from 0.5 mm to 100 mm
xik : result of measurement carried out by laboratory i for gauge block with nominal length Lk expressed as the deviation from nominal length in nm
uik : combined standard uncertainty of xik reported by laboratory i
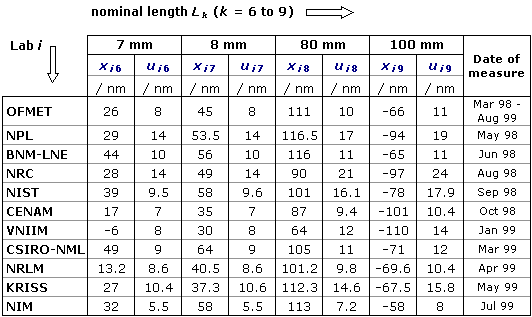
MEASURAND : Central length of tungsten carbide gauge blocks measured by interferometry according to ISO 3650
NOMINAL VALUES : 9 gauge blocks from 0.5 mm to 100 mm
xik : result of measurement carried out by laboratory i for gauge block with nominal length Lk expressed as the deviation from nominal length in nm
uik : combined standard uncertainty of xik reported by laboratory i
