

APMP.L-K1 and APMP.L-K1.1
MEASURAND : Length of gauge blocks
TRAVELLING STANDARDS : 10 steel gauge blocks
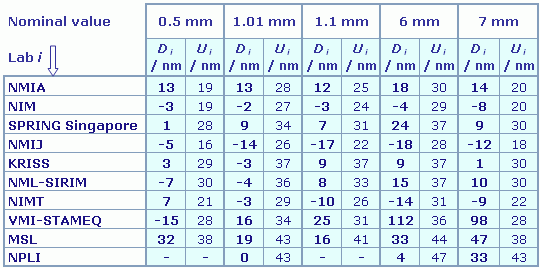
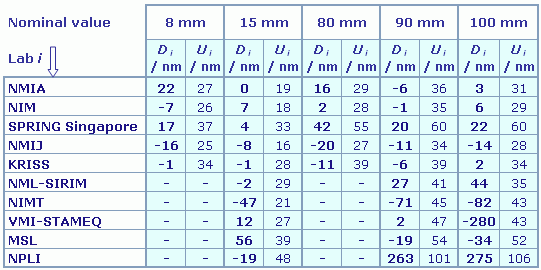
Key comparison APMP.L-K1: Degrees of equivalence, Di and expanded uncertainty Ui, of each laboratory i participant in APMP.L-K1 with respect to the APMP.L-K1 reference value for each gauge block, expressed in nm.
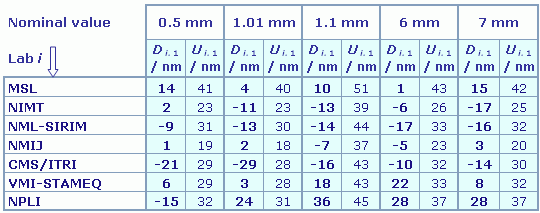
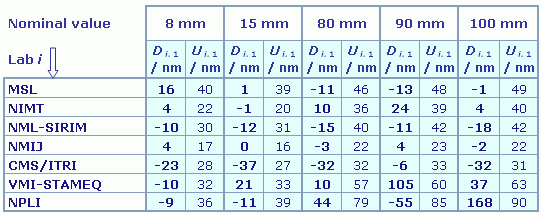
Key comparison APMP.L-K1.1: Degrees of equivalence, Di.1 and expanded uncertainty Ui.1, of each laboratory i participant in APMP.L-K1.1 with respect to the APMP.L-K1.1 reference value for each gauge block, expressed in nm.
APMP.L-K1 results and APMP.L-K1.1 results are not linked to any other key comparison results, and not linked together. However, for each nominal value, APMP.L-K1 and APMP.L-K1.1 graphs of equivalence are built up using the same scales and are shown side by side:
APMP.L-K1 and APMP.L-K1.1
MEASURAND : Length of gauge blocks
TRAVELLING STANDARDS : 10 steel gauge blocks
Degrees of equivalence, Di and expanded uncertainty Ui, relative to the APMP.L-K1 reference value for each nominal length:
MEASURAND : Length of gauge blocks
TRAVELLING STANDARDS : 10 steel gauge blocks
Degrees of equivalence, Di.1 and expanded uncertainty Ui.1, relative to the APMP.L-K1.1 reference value for each nominal length:
Results are presented under A4 printable format in Summary Results (.PDF file).
| Metrology area, Sub-field | Length, Dimensional Metrology |
| Description | Gauge blocks by interferometry |
| Time of measurements | 2005 - 2006 |
| Status | Approved for equivalence |
| Final Reports of the comparisons | |
| Measurand | Central length: 0.5 mm to 100 mm |
| Transfer device | Steel gauge blocks |
| Comparison type | Key Comparison |
| Consultative Committee | CCL (Consultative Committee for Length ) |
| Conducted by | APMP (Asia Pacific Metrology Programme) |
| Comments | The central length of gauge blocks is measured by interferometry according to ISO 3650.
APMP.L-K1.1 results published on 24 July 2009 Gauge blocks by interferometry (APMP.L-K1 and APMP.L-K1.1 graphs of equivalence are shown side by side)
|
| Pilot institute |
NMIJ AIST
National Metrology Institute of Japan Japan |
| Contact person | Akiko HIRAI +81 29 861 4283 |
| Pilot laboratory | |
|---|---|
| NMIJ AIST |
National Metrology Institute of Japan, Japan, APMP |
| CMS/ITRI |
Industrial Technology Research Institute/Center for Measurement Standards, Chinese Taipei, APMP |
| MSL |
Measurement Standards Laboratory, New Zealand, APMP |
| NIMT |
National Institute of Metrology (Thailand), Thailand, APMP |
| NML-SIRIM (became NMIM) |
National Metrology Laboratory, SIRIM Berhad (became National Metrology Institute of Malaysia), Malaysia, APMP |
| NPLI |
CSIR National Physical Laboratory of India, India, APMP |
| VMI-STAMEQ |
Viet Nam Metrology Institute, Directorate for Standards and Quality, Viet Nam, APMP |
This page proposes print-out on A4 paper (portrait) of the comparison details (best printed out using a black and white printer).
Please, select items to be printed out, then click on "OK" :
APMP.L-K1 and APMP.L-K1.1
MEASURAND : Length of gauge blocks
TRAVELLING STANDARDS : 10 steel gauge blocks
|
For each nominal value, the APMP.L-K1 reference value, xR, is obtained as the weighted mean excluding outliers and MSL results (see Section 4 of the APMP.L-K1 Final Report). The standard uncertainty, uR, of xR is computed as the internal standard deviation of the weighted mean. |
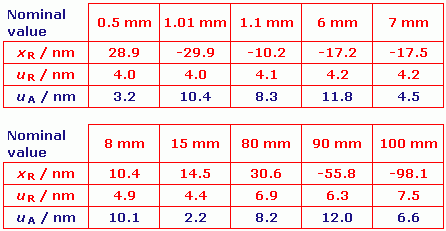
| For each nominal value, the degree of equivalence of each laboratory i participant in APMP.L-K1 with respect to the APMP.L-K1 reference value is given by a pair of terms: Di = xi - xR, and Ui, its expanded uncertainty (k = 2) with Ui = 2(ui2 - uR2 + uA2)1/2; uA is the uncertainty linked to the artefact. |
| No pair-wise degrees of equivalence are calculated. |
Results of key comparison APMP.L-K1 are not linked to any other key comparison results.
MEASURAND : Length of gauge blocks
TRAVELLING STANDARDS : 10 steel gauge blocks
|
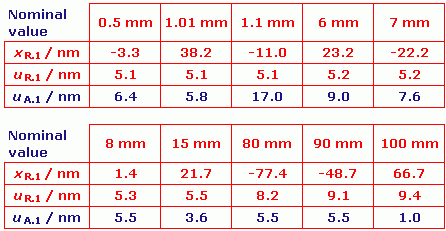
For each nominal value, the APMP.L-K1.1 reference value, xR.1, is obtained as the weighted mean excluding outliers and CMS results (see Section 5 of the APMP.L-K1.1 Final Report). The standard uncertainty, uR.1, of xR.1 is computed as the internal standard deviation of the weighted mean. |
|
For each nominal value, the degree of equivalence of each laboratory i participant in APMP.L-K1.1 with respect to the APMP.L-K1.1 reference value is given by a pair of terms: Di.1 = xi .1 - xR.1, and Ui.1, its expanded uncertainty (k = 2) with |
| The pair-wise degrees of equivalence are not calculated. |
Results of key comparison APMP.L-K1.1 are not linked to any other key comparison results.
However, for each common nominal value, the APMP.L-K1 and APMP.L-K1.1 graphs of equivalence are shown side by side.
APMP.L-K1 and APMP.L-K1.1
MEASURAND : Length of gauge blocks
TRAVELLING STANDARDS : 10 steel gauge blocks
xi : average of the central length measured in two orientations by laboratory i
ui : combined standard uncertainty of xi
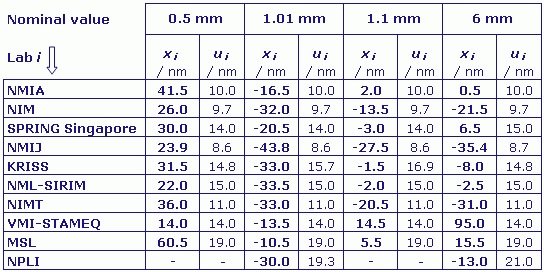
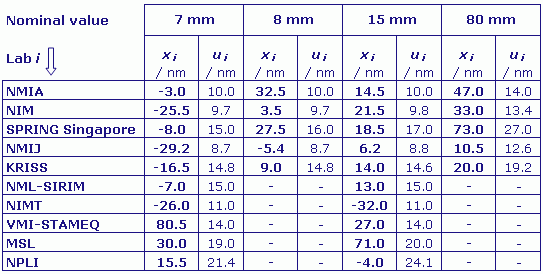
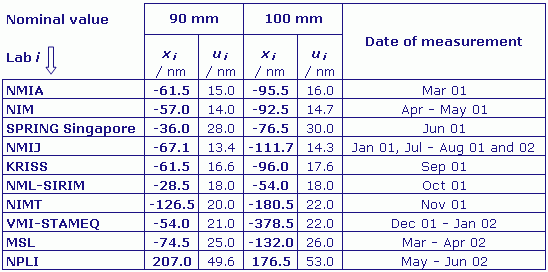
Two of the steel gauge blocks (8 mm and 80 mm) were damaged in the course of the comparison.
CMS/ITRI was unable to participate due to instrument failure.
MEASURAND : Length of gauge blocks
TRAVELLING STANDARDS : 10 steel gauge blocks
xi.1 : average of the central length measured in two orientations by laboratory i
ui.1 : combined standard uncertainty of xi.1
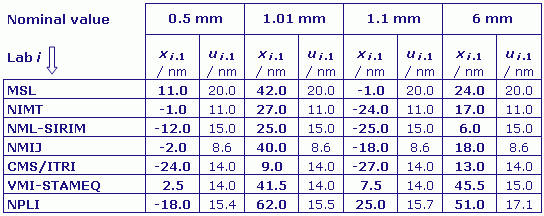
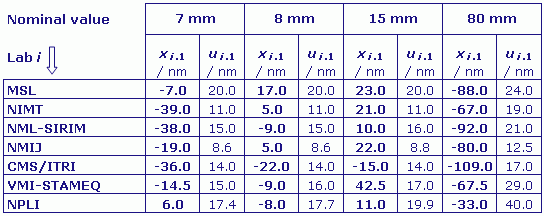
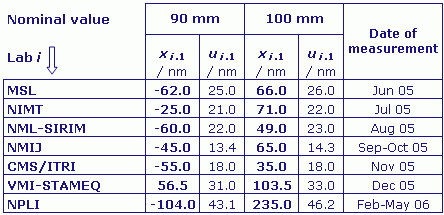
Measurements were also carried out at NMIJ in May 2005 (before the beginning of the comparison) and from June to August 2006 (after the end of the comparison). They are not reported here. The degrees of equivalence of NMIJ are computed using the measurement results obtained in September and October 2005.