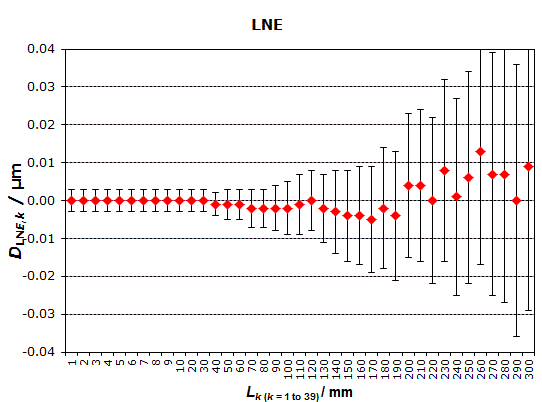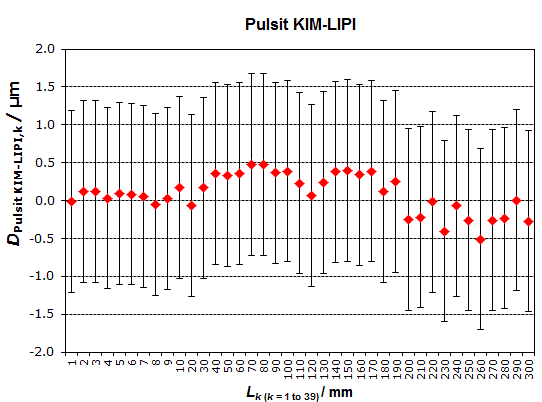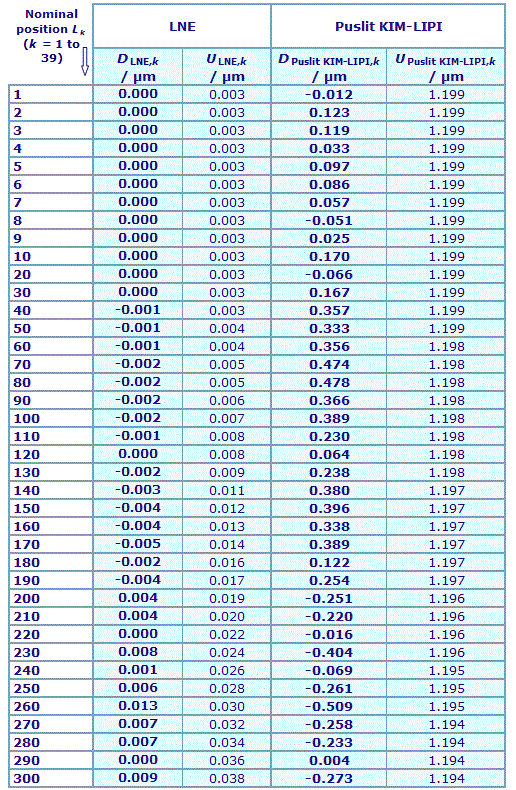

MEASURAND : Distance between the centre line position of the reference line and the centre line position of the measured line of the linescale
NOMINAL VALUES : 39 nominal values from 1 mm to 300 mm
Degrees of equivalence relative to the respective key comparison reference values Dik and associated expanded uncertainty (coverage factor 2) Uik for the 39 nominal positions

Results are presented under A4 printable format in Summary Results (PDF file).
| Metrology area, Sub-field | Length, Dimensional Metrology |
| Description | Linescales |
| Time of measurements | 2014 |
| Status | Approved for equivalence |
| Final Reports of the comparisons | |
| References | |
| Measurand | Distance between center lines to the center line labelled "0" |
| Transfer device | 300 mm long linescale |
| Comparison type | Key Comparison |
| Consultative Committee | CCL (Consultative Committee for Length ) |
| Conducted by | EURAMET (European Association of National Metrology Institutes) |
| RMO Internal Identifier | EURAMET Project No 1320 |
| Comments | Results published on 11 September 2015 Linescales
|
| Pilot institute |
LNE
Laboratoire national de métrologie et d'essais France |
| Contact person | José SALGADO +33140433957 |
| Pilot laboratory | |
|---|---|
| LNE |
Laboratoire national de métrologie et d'essais, France, EURAMET |
| Puslit KIM-LIPI (became SNSU-BSN) |
Research Center for Calibration, Instrumentation and Metrology – Indonesian Institute of Sciences (became National Measurement Standard - National Standardization Agency of Indonesia), Indonesia, APMP |
This page proposes print-out on A4 paper (portrait) of the comparison details (best printed out using a black and white printer).
Please, select items to be printed out, then click on "OK" :
MEASURAND : Distance between the centre line position of the reference line and the centre line position of the measured line of the linescale
NOMINAL VALUES : 39 nominal values from 0.1 mm to 300 mm
|
For each line position k, the key comparison reference value xRk is obtained from the weighted mean xwk (with weights wik based on each reported uncertainty) of the participants' values xik by adding a constant Ck chosen such that the reference value is the nominal length Lk = xwk + Ck. The standard uncertainty uRk of the key comparison reference value is obtained from the reported standard uncertainties of the laboratories.
|
| For each line position k the degree of equivalence of laboratory i with respect to the key comparison reference value is given by two terms both expressed in µm: Dik = (xik + Ck) - xRk = xik - xwk, and Uik its expanded uncertainty (coverage factor 2), Uik = 2(uik2 - uRk2)1/2. |
|
The calculation of the degree of equivalence between two laboratories i and j is not recommended for comparisons involving many measurands since it cannot be expressed with a single pair of terms. It would have to be calculated separately for each line position k and would then be given by a pair of terms both expressed in µm: Dijk = xik - xjk, and Uijk its expanded uncertainty (coverage factor 2), Uijk = 2(uik2 - ujk2)1/2. |
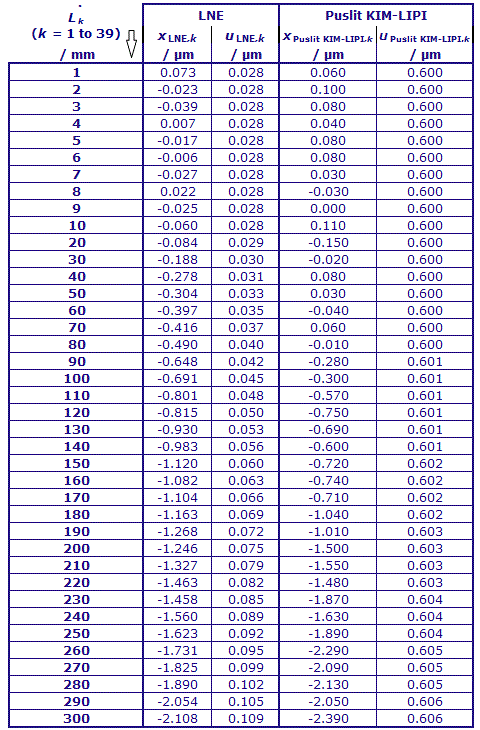
MEASURAND : Distance between the centre line position of the reference line and the centre line position of the measured line of the linescale
NOMINAL VALUES : 39 nominal values from 1 mm to 300 mm
xik : deviation from the nominal value reported by laboratory i for the line centre at nominal distance Lk expressed as the deviation from nominal length in nm
u ik : standard uncertainty of xik reported by laboratory i
The measurements were carried out in November 2014.
